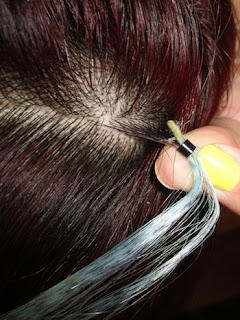
Before anyone makes a comment about it, I want to first mention that these feather extensions are not made of real feathers. They are synthetic faux feather extensions made to look like real feathers. :)
Feather extensions are pretty trendy this season. I'm not sure how everyone else feels about them but I personally think it looks cute if it's not overdone. Getting feather extensions, or any extensions I presume, can get pretty expensive if you get it done professionally. And since I'm more budget friendly when it comes to doing pretty much everything, I thought it would be fun to try DIY feather extensions myself. Applying the feather extensions was pretty easy. I practiced a little bit without the hair extensions which helped me a lot when I actually applied the extensions. I did it in one try!
You can purchase everything in this tutorial at bornprettystore.com (not including the pliers I used). They provide different color hair extensions to choose from. The colors range from pink, red, blue, green, etc. But since I already have red hair I wasn't sure how well the feather extensions would stand out so I picked a color closes to what I wanted, which was white, and got the sky blue color instead.
Note: This is just a tutorial on how to apply feather extensions. If you don't like it please keep your comments to yourself. :)
What You Will Need:
□ Hair extension pulling needle (link)
STEP 1: Open the latch door on your pulling needle
STEP 2: Insert the hair extension micro bead
STEP 3: Pick out a few strands of hair using the hook of the pulling needle and close the latch door.
STEP 4: Slide the micro bead upwards and pull the needle downwards to pull your hair through the bead.
STEP 5: Bring the micro bead close to your roots.
STEP 6: Insert your feather extension through the hole.
STEP 7: Take your pliers and clamp the micro bead till it is secure.
Make sure the micro bead is squeezed tightly to ensure it won't fall off.
FINISHED!
Feather extensions can last you a good while (a few weeks to a few months) if you take care of them properly. They can withstand being washed but just be careful not to tug on them. I have not yet tried straightening or curling the extensions. I've heard a number of people say that you can but many others have said that you can't apply heat to them and I don't want to take the risk of ruining them so I choose to leave it how it is. Anyway, I hope you all find this tutorial helpful if you decide to do feather extensions on yourself or for others. :)
Have any of you tried feather extensions?
How do you like them?
DISCLAIMER: In no way is this blog accepting any form of payment for products received by companies. The products reviewed on this blog are based on the opinions and experiences of the author. The products in this review were provided by the company.


Thanks for the tutorial! It seems pretty straight forward. Of course now I want to try it! :)
ReplyDeletei've seen these. i do like them.
ReplyDeletetzeyien89.blogspot.com xxx
Wow, bunch of artistic Hair Extensions. Can't wait to try it..
ReplyDeleteI cant find the kind of feather i want in my hair!!
ReplyDelete