Connect

Friday, May 13, 2011

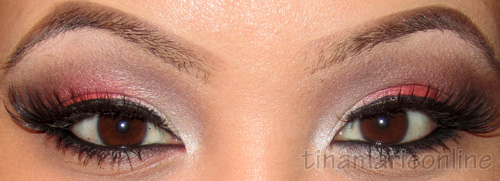
FOTD: Pinky Red & Brown + Picture Tutorial

I had time to play makeup today! I haven't done so in a long time because my other life takes over me. And when I say other life, I mean everything that has nothing to do with my makeup blog. Since I had time to play around I thought I would attempt to do a tutorial. I wasn't sure how it was going to turn out but it turned out okay I guess! The tutorial is pretty basic. I didn't want to go into too much detail like I used to but hopefully these pictures justify the whole concept of what I was doing. If you have any questions about it then feel free to leave a comment and ask. Other than that, thanks for reading!


EYES:
UDPP in Eden (primer)
MAC Painterly paint pot (second base)
Inglot 393 pearl (inner 1/3)
Inglot 366 matte (middle lid)
Inglot 360 matte (above crease)
Inglot 352 matte (brow bone)
Inglot 363 matte (outer "V")
Inglot 423 pearl (darken outer "V")
MAC Blacktrack fluidline
MAC Smolder eye kohl (set with black eyeshadow)
False eyelashes from KkcenterHk (style A013)

BROWS:
NYC Browser brow kit

CHEEKS:
NARS Orgasm blush

LIPS:
MAC Flowerplay lipstick
MAC Nice Kitty lipglass

Wednesday, May 11, 2011

INGLOT Eyeshadow Swatches Part 2

Inglot eyeshadow swatches part 1

Here's another palette I purchased that is more focused on neutral colors. Since I'm loving everything about Inglot I wanted shadows that I could use more everyday, and well, you can never have too many neutral shades!

Eyeshadow Finishes:
→ Matte - flat finish with no shine, shimmer, or sparkle
→ Pearl - pearly sheen with a bit of a satiny frost but does not contain any bits of glitter
→ DS (Double Sparkle) - Matte based eyeshadow with sparkle
→ AMC (Advanced Makeup Component) - semi-matte base with sparkle but less glittery than DS finishes.
→ AMC Shine - Highly pigmented with a pearly, frosty finish. More shinier than Pearl finishes.


TOP ROW
63 AMC → Semi-matte with a slight sheen
52 AMC → Light brown with flecks of gold glitter
457 DS → Chocolate brown with gold shimmer
360 Matte → Taupe color
390 Matte → Pale taupe color

(I had a little bit a trouble photographing these because of its high sheen but the colors are a lot more pigmented than what is shown)
BOTTOM ROW
07 AMC Shine → Shimmery light rose gold
08 AMC Shine → Shimmery champagne with a golden sheen
393 Pearl → Shimmery light peach
352 Matte → Pale light pink
407 Pearl → Coral with a golden iridescence

Thursday, May 5, 2011

Coral, Teal & Purple EOTD Using Inglot Cosmetics

I wore this look the other day and my boyfriend said it reminded him of movie theater carpet. Haha movie theater carpet!? I have no idea where guys come up with these things. He said it wasn't a bad thing, it was just the first thing that came to his head. But what a way to make me feel good... not! lol. Anyway, I did this look just for fun because I haven't used all my Inglot eyeshadows yet. Thanks for reading. Enjoy!


Inglot eyeshadow swatches

EYES:

Inglot 361 Matte (inner third)
Inglot 372 Matte (middle lid)
Inglot 504 DS (outer third)
Inglot 491 DS (outer corner & crease)
Inglot 351 Matte (highlight)
MAC Blacktrack fluidline
Model 21 Lashes No.x-36
CoverGirl LashBlast Fusion mascara
UD 24/7 eye pencil in Zero (set with MAC Carbon e/s)

BROWS:
NYC Browser brow kit

Thursday, April 28, 2011

Bright Smokey Blue Using Inglot

I will be doing a post on my Inglot eyeshadows soon! For the meantime I hope you enjoy this look. It's a simple smokey eye with a pop of bright blue in the center. I also applied a gold eyeshadow to my inner lower lash line but it's not visible. It really didn't serve any purpose anyway since the blue was so bright it stood out from everything else. Thanks for reading! Enjoy! :)


EYES:
NYX Jumbo Eyeshadow Pencil in Milk (all over lid)
Sugarpill Tako eyeshadow (inner corner)
Inglot 371 Matte (middle lid)
Inglot 483 DS (outer lid)
Inglot 65 AMC (outer corner, crease, outer lower lash line)
Inglot 54 AMC (above crease)
Inglot 351 Matte (highlight)
Sugarpill Goldilux loose eyeshadow (inner lower lash line)
Lashes from KkcenterHk

BROWS:
NYC Browser brow kit

CHEEKS:
 Too Faced Ooh La Rouge Pink Provocateur

LIPS:
Foundation + MAC Viva Glam VI lipglass

Tuesday, April 19, 2011

Manly 80 Color Eyeshadow Palette from KKcenterHk Review, Photos & Swatches

Manly 80 Color Eyeshadow Palette is a portable makeup palette with a mixture of matte and shimmer eyeshadows for anybody to create endless color combinations for their eyes. This palette is great for people who are just starting out in makeup and don't want to spend too much money on expensive eyeshadows because they're perfect for playing around with colors and coming up with different looks. You can find this palette at KKcenterHk.com for $21.33USD.


Randomly picked eyeshadows on top of NYX Jumbo Eyeshadow Pencil in Milk

Randomly picked eyeshadows on top of NYX Jumbo Eyeshadow Pencil in Milk

PROS:
→ Variety of colors to choose from
→ Inexpensive
→ You get a mixture of eyeshadow finishes including matte, shimmers, and satin
→ Some colors are pigmented when packed on with a flat eyeshadow brush
→ Other colors are sheer but you can build up the intensity
→ Lasts pretty long on your eyes with just minimal creasing

CONS:
→ Eyeshadows are powdery
→ Some shades have fall out
→ A few colors were dried out and didn't provide any color on the skin
→ Some colors were a little too sheer for me. I like my colors vibrant!


FINAL THOUGHTS:
→ I would say this palette is comparable to Coastal Scents palettes being that they're great for people who are just starting out in makeup. But from experience, the Coastal Scents palette is a little better as far as pigmentation goes. But this palette is great nonetheless because you get a wide variety of colors to play around with and you're not stuck with one eyeshadow finish. However, I don't recommend this if you plan to use it for professional use because the quality isn't the greatest. If you want eyeshadows to use on yourself for practice or to create different combinations of looks then this palette would be great. Also if you like to add color to your looks without going over the top with super bright intensity then this is great too because they go on pretty sheer unless you pack them on.

WOULD I RECOMMEND THIS PRODUCT? Yes if you're just starting out in makeup because it's inexpensive and you get what you pay for.

WOULD I PURCHASE THIS PRODUCT AGAIN? No.


DISCLAIMER: In no way is this blog accepting any form of payment for products received by companies. The products reviewed on this blog are based on the opinions and experiences of the author. The products in this review were provided by the company.

Monday, April 18, 2011

The Nude Pumps Diaries


If your remember about a month ago I blogged about how I was lusting over nude platform pumps. Well I was finally able to purchase them. Two pairs actually! So my boyfriend and I were shopping at the mall yesterday and we stopped by Nordstrom Rack to look for shoes that I wanted to wear for Easter. We were going up and down aisles and I found a cute pair of four inch nude heels from Jessica Simpson. They were your basic nude heels and I just had to get them! They were originally in the $70 range and I bought them for only $30!! It was a no brainer haha.

So I was still looking around and I found another AMAZING pair of nude PLATFORM pumps from Steve Madden that I fell completely in love with. Except they weren't the ones I have been looking for because they were open toe. Nonetheless they were still the sexiest pair of pumps ever and they were only $50 compared to their original price of over $100! I was torn between the two so I pretty much had to go with what my gut was feeling, which were the Jessica Simpson heels.

Being that I'm a pretty swift shopper and I have a good eye for hidden treasures, my boyfriend decided to hide the Steve Madden pumps in case I decided to come back and get them. I wear a size 7.5 and I wasn't going to take the risk of losing this pair so it was hidden in the most obscure place which happened to be in the corner of the highest shelf in the section of women's size 13 shoes!! Yeah, NOBODY was gonna find them! I made sure of it!!

So all night last night and all day today I kept thinking to myself that I had to go back and get that pair! And today I went back with my boyfriend to pick them up. I already had the pair in my hands, ready to checkout but my boyfriend and his crazy way of thinking thought that maybe we should check the aisles again in case I find a pair of the ones I really wanted (the ones pictured above). And oh my goodness was I glad that I listened to my boyfriend. At that point I was starting to think that he's my lucky shopping partner because he found it for me. The only problem was that the other shoe had been separated! 0__________0 I was about to cry!

But my wonderful boyfriend was so kind enough to help me go through EVERY. SINGLE. AISLE. of shoes until we found that missing shoe. Really though, he was such a good sport. Going up and down the aisles, scavenging through shelves of shoe boxes, being so determined to find it for me. Seriously ladies, my boyfriend is a great person to shop with hahaha!

Then FINALLY!!! It was like I heard angels singing and out of the mist of shoe boxes, there it was sitting all alone. And again there I was stuck between both pairs of Steve Madden pumps. Open toe? Closed toe? I couldn't choose!!! They were both sexy as hell! Obviously I went with what was most comfortable on my feet and what looked better with any outfit and of course, the one my boyfriend liked better on me. I'm so glad I found them! I think they were the only ones, at least in my size! And for a really inexpensive price which would have been sold for much more... I couldn't be happier!

So yeah, that pretty much covers my adventure for today hahaha. I ended up paying $50 for a $100 pair of shoes. I'm pretty sure I'm not the only one who would turn into an insane shopper! Lol thanks for reading! :)

Friday, April 15, 2011

Maybelline Fit Me Pressed Powder Review, Photos & Swatches

I'm so excited for Summer! I love Spring but I'm more excited for Summer because I think about going to the beach, driving with the windows down, going to the Del Mar Fair, and my birthday! But just like the weather in San Diego, it's starting to get warm now and it's having a huge impact on my skin.

Ever since I had my Rhinoplasty I noticed my skin getting oily more frequently. I used to have normal skin but now I have normal to combination skin with an oily T-zone. I don't know what happened or how it happened but it just happened! So my face gets oily throughout the day and I was in search of a decent drugstore powder to take with me on the go to save me from this issue.

I used to touch up with my MAC Studio Fix powder or my MAC MSF Natural but then I stopped for several years. Then the only thing I would use to set my foundation was my Laura Mercier Translucent Loose Setting Powder but I would never take that with me on the go. So I never had a touch up powder for a very long time and at first it never used to bother me until I realized how much my face got shiny after a couple of hours. And because the weather is changing soon, I thought I should break my habit of not having a touch up powder and finally go out and get one. I wanted something simple and inexpensive. I wasn't looking for much coverage I just wanted something to absorb the oils in my face.


Product Details

Why You'll Love It

It's makeup that doesn't mess with you.
→ Natural coverage that leaves skin the way it was meant to be…fresh, breathing, flawless
→ No oils, no waxes, no nonsense

AVAILABILITY:  Local drugstores such as Walmart and Target
PRICE: Around $5 USD
SIZE: 0.3 OZ (9 g)
VALUE FOR PRICE: 5/5
EASE OF USE: 5/5
PACKAGING: 3.5/5
MEETS EXPECTATIONS: 4/5
OVERALL USE: 4.5/5

PROS:
→ Inexpensive
→ Diminishes the appearance of pores
→ Wide range of colors to choose from
→ Absorbs oils and mattifies your face
→ Comes with a mirror and powder puff
→ Feels very light and airy

CONS:
→ Not very pigmented
→ Not ideal if you're looking for coverage
→ Requires a little bit of touch up every couple of hours but not a whole lot
→ Packaging is a little bulky but it's not a huge problem for me personally

FINAL THOUGHTS:
→ I ended up getting shade 210 (Sandy Beige) even though it may be a tad bit too light for me. But because it has very little color pay I thought it would be fine for my skin tone. And since I feel like my foundations tend to run a little dark for me, this shade would fix that.

→ I carry my MAC 129 SH brush with me and I use that to touch up my foundation. I noticed right off the bat that not only does it absorb your natural oils on your face but it also hides your pores. Now I don't have HUGE pores but they're visible to myself so I always notice them. But with this powder, it hides them and it gives my face such a smooth canvas. That's a plus!

WOULD I RECOMMEND THIS PRODUCT? Yes but only for people who are looking for a powder to hide away shine but not coverage.
WOULD I PURCHASE THIS PRODUCT AGAIN? Yes.


DISCLAIMER: The products reviewed on this blog are based on the opinions and experiences of the author. This product was purchased by the author and in no way was this review influenced by the company of the product.

Monday, April 11, 2011

Matte & Crackle Nail Polishes From Born Pretty Store

So we all know how much matte and crackle nail polishes have made their way into the nail game for quite some time now. Some of us jump into the hype and some of us don't. I obviously like to know what's hot and what everyone is wearing because I want to be up to date about these things! Especially if it's something that's really eye catching. You can find these nail polishes at Born Pretty Store along with many other things. If you haven't checked out their website yet then I highly suggest you get to it soon.
When I received these nail polishes I tried to refer them back to their website so I can link my readers in case anyone would be interested in them. The problem is that their nail polish section isn't really categorized under brand names, rather their finishes. So if you visit their website and search under matte nail polishes or crackle nail polishes then you'll be able to find them. I will provide links to where you can find the nail polishes on their website.


I can't really describe this color but it's really pretty and it's different from a lot of nail polishes that I have. The website describes it as a shimmery gold but to me it's more on the shiny silver side with a touch of a rose color when it catches the light. It's really bright and metallic however it takes a while to dry on it's own. It's also a little hard to remove but it lasts all week.
(product link)


Crackle Nail Polishes


I'm still getting the hang of crackle nail polishes. It's really a hit and miss when you apply it because you're not sure if you're going to get the best crackle on the nail. It took me about two tries to get it right. You can see that on some nails it crackled really well while for some it didn't crackle so much. The reason is you have to apply just the right amount of polish to get a good amount of crackle. For best results I suggest a thin, even layer. These particular crackle polishes are also extremely difficult to remove! I spent a lot of time trying to remove every last residue of the polish and trust me, it took a lot of work! You can also see around the tip of the nail the way the crackle is really thin and close together. Those are typically the areas that chip off the fastest after a day or two. TIP: Apply crackle polish on top of a fresh manicure. I applied crackle nail polish on top of a few days old manicure and the crackle polish just flaked off. Top it off with a top coat for longevity.
(product link)


Matte Nail Polishes


The matte white polish is your basic stark white color. I thought it was a little TOO matte, if that makes sense. It looked a little bit chalky and streaky but would look great with a shiny top coat, which would basically defeat the purpose of a matte nail polish haha. The pinkish purple matte polish was really gorgeous. It's a matte polish but because it had shimmer in it, it looked more like a velvety-satin finish which I thought was really nice.
(product link)


DISCLAIMER: In no way is this blog accepting any form of payment for products received by companies. The products reviewed on this blog are based on the opinions and experiences of the author. The products in this review were provided by the company.