Connect

Sunday, February 28, 2010

Product Review: Merlot Natural Grape Seed Moisturizer

The reason why I decided to try out this new moisturizer was because I noticed my face was getting really oily and the moisturizer I was currently using was not helping with my oiliness at all! It was actually making it a lot worse. I purchased this moisturizer with the help of Christiana Divine because she also uses this moisturizer and it seems to work wonders on her skin.


The reason why I'm using this moisturizer for my oily skin is because it's not like your typical creamy moisturizers that sometimes leaves your face feeling sticky. This moisturizer has a very light consistency and it absorbs quickly. This moisturizer reminds me of Clinique's Moisture Surge which has a gel-creme like consistency.


What it is: MERLOT is made of natural red grape seed polyphenals. It offers sensational antioxidant properties thereby helping to inhibit the aging process. MERLOT is fragrance free, non-oily, absorbs quickly.


AVAILABLE AT: Walgreens
PRICE: $15 USD
SIZE: 4 fl oz (118 ml)
VALUE FOR PRICE: 4/5
EASE OF USE: 4/5
PACKAGING: 3/5
MEETS EXPECTATIONS: 3/5
OVERALL USE: 3/5


PROS:
Comes in a big jar with a lot of product inside it. Can last you a long time!
Has SPF 15
Has sort of a pleasant soapy smell to it which isn't horrible. (Others describe it as grapefruit but I beg to differ)
Non-oily which is ideal for people who already have oily skin.
Leaves your skin feeling hydrated, refreshed, and smooth.
Can be used day or night.
Absorbs quickly
Made my skin less oily.
Has anti-aging antioxidants
It comes with a travel size container when you purchase it. (15 ml)

CONS:
I felt that it absorbed TOO MUCH of my skin's natural oils that it kind of made my skin a little dry around my chin.
My nose gets the most oily and this did maintain the oiliness around there but it was still slightly oily.
Because it's so light and absorbs almost like water, I feel like I had to put on more to feel like I'm getting enough moisture.
The packaging says it's fragrance free but it's not.
Having to dip your finger into the jar isn't very sanitary.
After my first night of using this product I grew about 3 pimples on my forehead but they've subsided quickly after that.
More ideal for people who have oily skin. (can also be a plus!)

OVERALL:
I have only been using this moisturizer for about a week. So far I like it, but I don't love it. It has its up and its downs and I'm going to continue using because it does a much better job at maintaining the oiliness on my face than my previous moisturizer. The only irritation I've had with this product was the dry patchiness around my chin but I'm not sure if this is caused by the moisturizer. I also let my boyfriend use the small travel size container that it comes with because he CLAIMS he has oily skin. But he said it left his face feeling irritated.

WOULD I RECOMMEND THIS PRODUCT? Yes only if you have oily skin.
WOULD I PURCHASE AGAIN? As much as I like this product, I have to love it before I consider repurchasing. And so far this product is just okay for me.


DISCLAIMER: The products reviewed on this blog are based on the opinions and experiences of the author. This product was purchased by the author and in no way was this review influenced by the company of the product.

Wednesday, February 24, 2010

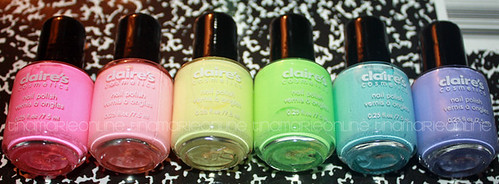
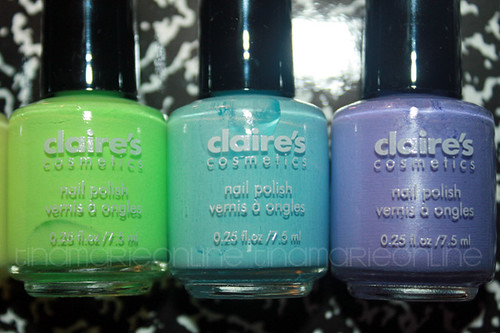
Review and Swatches: Claire's Pastel Nail Polish

I recently purchased this set of six pastel nail polishes from Claire's. If you don't know what Claire's is, it's a retail store that sells accessories, jewelry, and other fashionable items typically for the younger generation. I remember as a teeny bopper I would always shop at Claire's! This set of nail polishes really caught my eye because I'm such a junkie when it comes to rainbow colored... anything! And even though these were pastel, I knew they were gonna come out looking fabulous!

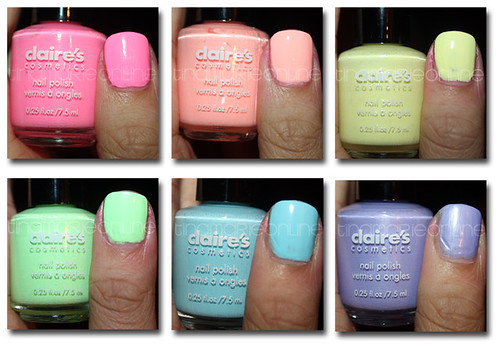
Before I go on to the review I just want to say how vibrant these colors are in real life. These colors would literally glow under a UV light! My camera does not do these swatches any justice and for you to actually get the full effect, you'd have to see it in person.

PRICE: $12.50 USD
SIZE: 0.25 fl. oz (7.5 ml) per container
VALUE FOR PRICE: 3/5 (roughly $2 per nail polish - $12.50/6 nail polishes = $2.08)
EASE OF USE: 4/5
PACKAGING: 3/5
MEETS EXPECTATIONS: 4/5
OVERALL USE: 4/5


PROS:
Colors are very vibrant and they all have a cream finish except for the purple. It has a slight shimmer to it. Nonetheless, all the colors are gorgeous!
Nice consistency, except for the first coat. After about two coats, the colors look very opaque which is a plus!
The price isn't too bad. You do get a variety of six different colors which are all amazing.
Quick drying.
    CONS:
    The size per nail polish. You don't get a whole lot but again, the variety of colors replaces that.
    The wand is pretty short. I like my nail polish wand to be fairly long for better control.
    First coat is a little runny. Two coats is fine but I think three coats will be best to get the overall opaqueness of each color.
    Not too sure yet on the lasting power but with any nail polish I recommend a good top coat.


      {Each swatch was about three coats of nail polish}
      TOP L to R: a toned down hot pink, a gorgeous pastel orange or better yet a peachy gorgeous color, & perfect pastel yellow!
      BOTTOM L to R: Perfect pastel green! I'm surprised this one doesn't look neon green, perfect pastel blue, what more can I say!? This last one is not a cream color but it's a lovely pastel purple that looks so dreamy in sunlight.

      OVERALL:
      I love love LOVE each one of these nail polishes. I love this entire collection and the color choices are on point! These colors SCREAM Spring! I love the fact that it's not your typical neon colors (though I love me some neon!) But these are so perfect for the Spring season and with Easter not too far away, the color combinations are endless!

      WOULD I RECOMMEND THIS PRODUCT? Yes
      WOULD I PURCHASE AGAIN? Yes


      DISCLAIMER: The products reviewed on this blog are based on the opinions and experiences of the author. This product was purchased by the author and in no way was this review influenced by the company of the product.

      Monday, February 15, 2010

      Tutorial: Complementary Colors - Purple & Yellow (hint of green)

      PICTURE HEAVY! If you guys have any ideas for me to do picture tutorials without posting so many pictures into one post, please let me know! I'm not sure if you guys would watch the video if I were to put these into a video slideshow. If you would much rather have it that way, let me know! Unless this way is fine with you too. =) Enjoy!

      Start off with a base.
      I used UDPP and then applied NYX Jumbo e/s pencil in Milk all over my lid.
       

      Apply a yellow eyeshadow (MAC Chrome Yellow) to the inner half of your eyelid.
        

      Tada! =)
        

      Apply a light/bright green eyeshadow (MAC Bitter) to the outer half of your lid.
        

      Blend the colors together and it should look like this.
        

      Apply a purple eyeshadow (MAC Violet Trance) lightly above the crease.
        

      It should look like this.
        

      Take a dark blue/purple eyeshadow (MAC Climate Blue) and with a pencil brush apply it to your outer corner.
        

      With the same color and brush, lightly define your crease.
        

      It should look like this.
        

      Take a pale lilac or light pink eyeshadow (MAC Up At Dawn) and apply it to your brow bone.
        

      Lalala...
        

      Take any shimmery highlight color (MAC Cloudbound) and apply it to the inner part of your eyelid.
        

      Take the same color and apply it as your highlight
        

      It should look like this
        

      I also applied a purple pigment (MAC Viz-A-Violet) to the inner part of my lower lash line and MAC Climate Blue to the outer part. Apply eyeliner and false eyelashes!

      The finished look


      Friday, February 12, 2010

      Golden Smokey Eyes + What Contacts I'm Wearing

      Please take 5 seconds of your time and vote on my poll on the sidebar. Thank you!

      I get a lot of questions on my formspring and in my comments about what contacts I'm wearing. In the previous look where I'm wearing contacts, it's in the color Honey from Freshlook. In this look I'm using Sterling Grey. I purchased these contacts at an optometry center in the Philippines. It was buy two pairs get another pair free. I also have contacts in True Sapphire. I can't remember exactly how much it cost but it was about P3000 for all three pairs. I'm gonna guess and say that's around 65 dollars. Anyway, here's a look I wore yesterday. I wish I had a really pretty gold eyeshadow or pigment to wear with this look but this will do for now. Hope you like it!

      EYES:
      MAC Rubenesque paint pot applied as a base
      MAC Cocomotion pigment applied to inner half of eyelid
      MAC Gentle Fume (discontinued) eyeshadow applied to outer corner and crease
      MAC Pandamonium (le?) eyeshadow applied to outer corner
      MAC Shroom eyeshadow applied as highlight
      MAC Blacktrack fluidline applied to upper lashline
      Revlon Colorstay eyeliner applied to lower waterline
      Ardell lashes #109


      CHEEKS:
      MAC MSF in Blonde


      LIPS:
      Rimmel l/s in Vintage

      Thursday, February 11, 2010

      SAD Day

      I call this my Anti-Valentine's Day look for all the single ladies out there who are celebrating SAD Day (Single Awareness Day). It's a little more edgy and badass! Definitely not your typical hot pink and red representation of how you would describe Valentine's Day to be.

      PS: I hate my lip color in this look. It would've looked way better with a soft pink or nude lip. I don't know what I was thinking with this custom made color using a lipstick and pigment mixed together. Ew!

      EYES:
      NYX Black Bean Jumbo e/s pencil applied all over lid as a base
      MAC Dark Soul pigment (LE) applied all over lid (you can use black eyeshadow)
      MAC Violet Trance eyeshadow applied above crease
      MAC Beautiful Iris eyeshadow applied above Violet Trance & inner corner
      MAC Phloof! eyeshadow applied as highlight
      MAC Silver Fog pigment applied to inner lower lash line
      MAC Viz-A-Violet pigment applied to outer lower lash line
      Shisem lashes
      Revlon Colorstay eyeliner on lower waterline

      CHEEKS:
      I can't remember

      LIPS:
      Don't ask! It's ugly!

      Tuesday, February 9, 2010

      Nail Polishes Haul

      I don't usually spend that much on nail polishes because I have short stubby nails and I could never do anything fancy shmancy to them. And I don't know if it's me but my nail polish start to chip within the next day. Maybe I'm just a "hands-on" type of person that I'm always bumping into things with my hands and working on things with them that they tend to chip. I also don't have the patience to wait for polish to dry. I get so impatient especially since I'm the type to always be doing something with my hands. For example, if I just painted my nails, within five minutes I'll end up needing something from inside my purse, inside a drawer, or I tend to do things that require hand movements and that's when my nail polish starts looking messed up and I end up with lines and chips in them.

      Anyway, to make the long story even longer, I was telling Victor how I wanted to buy more China Glaze nail polishes but I never ended up buying any because I never wanted to fork out the money. Then today Victor shows up with a grip of China Glaze and some L.A. Colors and Santee nail polishes for me! And get this, they were only $1 each! And in case you were wondering this IS a store in San Diego, not online. So I'm sorry for those who don't live in the area. But for those who are in San Diego, I have to ask Victor where he bought it but he said it was in some dollar store or something. I'll let you guys know. :)


      Sunday, February 7, 2010

      Simple Everyday Look

      Here's a simple look that I've been wearing on a daily basis when I don't feel like wearing too much makeup on. It's simple considering it uses only three MAC eyeshadows: Brule all over the lid, Honesty above the crease, and Intoxicate on the outer corners. For the cheeks I'm wearing MAC Feeling and on the lips I have on Revlon Nude Attitude l/s and NYX Cafe Latte l/g.


      Saturday, January 30, 2010

      Nose Job Before And After (Rhinoplasty)

      ** Unfortunately I am no longer accepting e-mails in regard to my rhinoplasty. The only way to get to me about my rhinoplasty is to ask your question on my Formspring (click here). However, if your question is already answered below, I will not respond to you. So please read the FAQ I have written below. I did my best to compile all the questions that were rather repetitive so hopefully some of these will answer you.

      I got my procedure done at Belo Medical Group in Greenhills. My first consultation was with Dr. Ed Yap on December 21, 2009 and my procedure was on December 23. Sutures and bandages were removed about a week after the procedure, December 28. And the entire healing process took about 2-3 weeks.

      FREQUENTLY ASKED QUESTIONS

      Did Dr. Yap do your nose for free so you can advertise for him online?
      □ Absolutely not! I cannot believe people assume this. I'm only here to share my experience, that is all.

      How much was the surgery?
      □ I'm unsure of the exact cost because there are other expenses besides the surgery such as the consultation, medication, check-ups prior to the surgery, etc. I would say to be in the ballpark around $2500-$3500. But you have to know that not everyone gets the same procedure done so prices will always vary from person to person.

      How much was everything in total (surgery, plane ticket, lodging, etc.)?
      □ I get so frustrated when people ask me this question because I can't guarantee that it will be the same for everyone. Please do your own research and do the math because I'm not the person to ask about that. And please don't ask what airline I took to get there because that will drive me crazy.

      How do you feel about your nose now?
      □ I love it.

      Did the doctor use silicone or gortex?
      □ He recommended gortex because he says that it's more flexible than silicone. Therefore, your nose would look more natural.

      How long did you have the stitches/sutures on?
      □ Honestly, I can't remember. I would say maybe a week.

      Were you able to do normal activities?
      □ Yes. As embarrassed as I was to be walking around with a face mask, I still went sightseeing and I was able to still enjoy my vacation. The only issue was that I couldn't open my mouth that wide to eat because my nose was taped up and it made my face stiff. The doctor also said to avoid swimming.

      After removing the stitches was it obvious you got your nose done?
      □ Yes and no. Yes because the stitches left a few scabs around my nose which had dried up blood and skin combined. I didn't want to pick it because I was afraid it would leave a scar so I covered it with makeup as best as I could.

      Was your nose swollen or bruised?
      □ It was swollen but it wasn't obvious. It just looked a little bit puffy. I did not bruise at all.

      How long was the surgery?
      □ I would say 2 hours or less. I can't remember.

      What was your reaction when you first saw your new nose?
      □ I was in completely shock, and that wasn't a good thing! I felt like I didn't look like myself and I almost wanted to cry. I really thought I would never look like myself again because to me I looked like a whole new different person. I didn't want to alter my looks. I just wanted to fix my nose. Then after about a day or two I was okay!

      Did your nose feel hard after the surgery?
      □ Yes it felt hard and at some point the tip of my nose even felt numb for a while. I assumed it was normal so I wasn't too concerned about it. Patience is key!

      Is one month a good amount of time to give your nose time to heal?
      □ Yes. I was in the Philippines for a month and I didn't get my nose done until half of my vacation trip was through. I think one month is more than enough time.

      Did you just walk into the clinic or did you have to make an appointment?
      □ Make an appointment. Call them!

      Were you able to wear makeup right away?
      □ The doctor never mentioned to me that I couldn't so I did!


      Will wearing glasses dent your nose right after surgery?
      □ Honestly I don't know. I don't think it would.

      Did you bring in a picture of someone's nose that you wanted to copy?
      □ My mom recommended someone but I had no idea who she was. I just trusted the doctor with his judgment and I let him do the magic.

      Can you push your nose up like a piggy anymore?
      □ No.

      Do you feel like your nose job affected the look of your eyes?
      □ If it did, it definitely affected it for the better. But I don't see any difference. When I first had it done my eyes did feel like it was being pushed together only because it was a little bit swollen and still tight in the area. But once it's settled in your face will go back to normal.


      What special care did you have to do on your nose before and after the surgery?
      □ Clean, clean, clean! You have to clean your nose every single day until you feel like you don't have to anymore. They gave me this certain nasal spray that you're supposed spray up your nostrils to help unclog your nose. Since you're unable to pick your nose, the spray helps loosen whatever gunk you have up there whether it's boogers, dried blood, or what have you, and drains it out. You also have to clean around where the stitches are/were to avoid any infection since they are practically open wounds.

      How long after you had the stitches removed did your nose heal?
      □ I would say maybe after about 3 weeks you'll start to feel comfortable with it but keep in mind it's not completely healed yet after this amount of time. To be quite honest, your nose doesn't actually "heal" until several months to a year. It takes a while for your nose to really set in. It took me more than a year for me to be able to pinch my nostrils together!

      Are there any visible scars on your nose?
      □ There is one very tiny scar on the side of my nostrils but it's not visible unless you're up close staring right at it. Other than that, no scars.

      What exactly did the doctor do to your nose?
      □ He added a more structured bridge and reconstructed my nostrils and septum to emphasize a better shape for my nose that would better suit my face. He brought my nose downward more to see less of my nostrils by adding cartilage to the tip. Cartilage was also added to the septum to help make it protrude downwards.

      Were you an outpatient?
      □ Yes I was an outpatient. The surgery took maybe 2 hours at the most. Once they were finished I was able to walk out with my new nose.

      Were you put to sleep?
      □ No.

      Do you notice or feel anything different now that your nose is healed?
      □ Well like I said it took about a year to finally allow myself to pinch my nostrils together so it's nice that I can finally do that now. I can't press down on my nose anymore. I probably can if I tried but I would rather not. I also noticed that my "T" zone on my face is more prone to getting oily now. I'm assuming this is because of my rhinoplasty. Maybe the skin is being stretched or pulled which is causing extra sebum on my face to produce more frequently than before since it's being "pressured". I used to never have oily skin and now I do. It bothers me sometimes but that's what touch up powder is for!

      Are you afraid you might hit your nose and has it made you more cautious?
      □ Yes! I am terrified of something hitting or falling on my nose. When I'm passing by a crowd I can't help but block my nose because I'm afraid someone might elbow me right in the face. I suddenly have a faster reflects now.  

      Are there any bad experiences during your nose job procedure?
      I had to save the best for last! I hate to get into detail about this because I don't want to alarm anyone but during my surgery the anesthesia began to wear off and for a second I actually felt the excruciating pain of the doctor working on my nose. It was the worst split second pain I've ever felt in my life. I wanted to cry but I couldn't do anything because my arms were strapped and they had my eyes taped shut. I was able to tell him that I could feel it and they were able to quickly add more anesthesia. That definitely scarred me because now I'm terrified to go under the knife unless I'm put to sleep. Also, removing the stitches was painful too. Feels like needles poking your nose!