Here is my current eyebrow tutorial. This is a highly requested tutorial and I finally was able to do it for you all. It still hasn't changed much from how I've always filled them in except now they're much more cleaner I think. I'm still using my all time favorite wax and brow powder from NYC. All the products I used are substitutable and mostly drugstore items. :)
PRODUCT DESCRIPTION: □ Diameter: 14.5 mm □ Base Curve: 8.6 □ Water Content: 38% □ Price: $20.00 USD □ Availability: Kiwiberry1-Collection
PROS: □ Comfortable □ Not too dramatic □ Makes eyes look larger but not too much
CONS: □ Not much opacity □ Difficult to put on □ Not much enlargement
COLOR: □ Upon seeing these lenses I really thought they were going to be a very light lilac color but it goes on a bit darker and more lavender. It's not as opaque which I was already aware since the purple looked almost transparent, though I wonder how these would've looked if they were more opaque. I think it has really good color pay off. From a distance it's a bit lighter but up close it's more vivid and brighter. On the other hand, it's not too light where it looks creepy but it's enough to be noticeable.
COMFORT: □ These lenses were so difficult for me to put on which is why I waited to review these last. I almost wasn't going to review them because for some reason they kept popping off! But after trying several times I finally was able to get them on and they were actually very comfortable! Very little discomfort and I experienced minimal dryness. Definitely a plus with these lenses!
FINAL THOUGHTS: □ I was extremely surprised to see how subtle these lenses were (and I use that term very loosely). I know violet is far from natural but these lenses were very wearable and they didn't look over the top cray! The fact that these were more subtle and wearable, not to mention comfortable, is a definite thumbs up for me!
DISCLAIMER: IN NO WAY IS THIS BLOG ACCEPTING ANY FORM OF PAYMENT FOR PRODUCTS RECEIVED BY COMPANIES. THE PRODUCTS REVIEWED ON THIS BLOG ARE BASED ON THE OPINIONS AND EXPERIENCES OF THE AUTHOR. THE PRODUCTS IN THIS REVIEW WERE PROVIDED BY THE COMPANY.
Ever since I saw Zombie Boy featured on a Dermablend ad for the Leg and Body Cover (click here), I instantly wanted to try their products. For a while now I've been searching high and low for my holy grail under eye concealer and although I can't exactly pinpoint what my favorite concealer is, this has definitely grown to be a favorite of mine!
AVAILABILITY:Dermablend.com PRICE: $21.00 SIZE: .3 FL. OZ.
□ Small amount goes a long way □ Doesn't look cakey
□ Feels lightweight
□ Doesn't look drying
CONS:
□ Comes in only 8 shades
FINAL THOUGHTS:
□ I purchased this concealer in the shade Sand and although it's a shade too light for my face, it does cover up blemishes fairly well despite its claim for being "medium coverage". This concealer works great for my dark under eye circles because it covers the darkness extremely well without accentuating them, and brightens up the eye area without fading or settling into lines. My main concern with under eye concealer is that it doesn't last throughout the day and begins to fade and crease but this concealer hasn't given me any issues.
DISCLAIMER: THE PRODUCTS REVIEWED ON THIS BLOG ARE BASED ON THE OPINIONS AND EXPERIENCES OF THE AUTHOR. THIS PRODUCT WAS PURCHASED BY THE AUTHOR AND IN NO WAY WAS THIS REVIEW INFLUENCED BY THE COMPANY OF THE PRODUCT.
□ The color of the lens is a vivid royal purple but when applied it turns into a more deep purple and less vivid. If you're looking for more dramatic purple lenses then these might not be what you're looking for especially if you have dark brown eyes. I think if you have anything lighter than brown eyes then these would be more vibrant and noticeable.
COMFORT:
□ These went on comfortably without much discomfort. I think these lenses were more comfortable than other lenses I've tried. They did begin to feel dry after a while as usual.
FINAL THOUGHTS:
□ These lenses definitely make my eyes look larger. I actually like that they are rather subtle than overly dramatic and obvious. I like that from far away the color seems almost unnoticeable until you look at it up close. I would most likely recommend this lens based on comfort and color.
DISCLAIMER: IN NO WAY IS THIS BLOG ACCEPTING ANY FORM OF PAYMENT FOR PRODUCTS RECEIVED BY COMPANIES. THE PRODUCTS REVIEWED ON THIS BLOG ARE BASED ON THE OPINIONS AND EXPERIENCES OF THE AUTHOR. THE PRODUCTS IN THIS REVIEW WERE PROVIDED BY THE COMPANY.
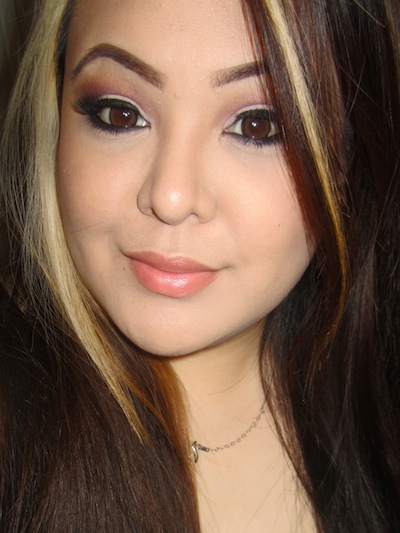
Hi! Here's a look that I wore when I went out Saturday night. I ended up switching out the lashes to something more comfortable because the lash band on these were way too thick and felt really pokey! I hope you all like this look. Thanks for reading! :)
EYES: □ Too Faced Shadow Insurance □ MAC Painterly Paint Pot □ MAC Fig. 1 eyeshadow (inner and outer third of the eyelid & crease) □ MAC Carbon eyeshadow (outer corner) □ Inglot #337 Matte eyeshadow (crease & transition color) □ Wet N Wild Lust Palette - pale pink eyeshadow (middle lid color) □ MAC Helium pigment (middle lid) □ Wet N Wild Lust Palette - high light color (brow bone highlight) □ Elf Cream Eyeliner (upper and lower lash line) □ MAC Smolder Eye Kohl (waterline) □ Covergirl Lashblast Mascara □ False eyelashes from Kiwiberry1-Collection.com
BROWS: □ NYC Browser Brow Kit □ MAC Carbon eyeshadow □ NYX Concealer in a Jar (shade beige)
CHEEKS: □ Wet N Wild Color Icon Bronzer in Princess □ Milani Dolce Pink baked blush
LIPS: □ Revlon Nude Attitude lipstick □ MAC Of Corset lipglass
Sorry everyone, this tutorial came out so horribly. I did this later in the day so my makeup isn't as fresh as it should've been. But I had time to knock off a tutorial which is why I went for it. I decided to go with a subtle pink for an inspired Valentine's Day look for those who want to go with something more simple. For what it is I hope you all like it. Thanks for reading. Enjoy! :)
EYES: □ Urban Decay Primer Potion □ Maybelline Color Tattoo 24HR Eyeshadow in Too Cool (lid base) □ Wet N Wild Greed Palette - Peach color eyeshadow (crease & transition color) □ MAC Cloudbound eyeshadow (lid color & inner lower lash line) □ Inglot #362 Matte eyeshadow (crease) □ Inglot #55 AMC eyeshadow (outer corner, crease & outer lower lash line) □ Wet N Wild Lust Palette - Dark purple eyeshadow (outer corner & outer lower lash line) □ Maybelline Fit Me Pressed Powder (brow bone highlight) □ Wet N Wild Creme Liner □ MAC Smolder Eye Kohl □ Glo Professional Water Resistant Mascara □ False eyelashes from bornprettystore.com
BROWS: □ NYC Brow Pencil in Taupe □ NYC Browser Brow Kit □ MAC Carbon eyeshadow □ NYX Concealer in a Jar (shade beige)
I attended an event where the theme colors were pink and green so I thought this would be a good time for me to play around with makeup by incorporating the colors and creating a Valentine's Day inspired look. I actually got a lot of compliments on this look despite how easy it was to do. I like how vibrant it is but still easy on the eyes and extremely wearable. Hope you like it! :)
EYES: □ Too Faced Shadow Insurance □ MAC Painterly Paint Pot □ Glamour Doll Eyes Be Mine eyeshadow (outer 2/3 of eyelid) □ Glamour Doll Eyes Dolly eyeshadow (inner 1/3 of eyelid) □ MAC Shadowy Lady eyeshadow (outer corner) □ Wet N Wild Greed Palette - peach color eyeshadow (transition color) □ Maybelline Fit Me pressed powder - shade 220 (brow bone color) □ Urban Decay 24/7 eye pencil in Stash (lower lash line) □ Glamour Doll Eyes Shamrock eyeshadow (lower lash line) □ Wet N Wild Creme Liner (upper lash line) □ MAC Smolder Eye Kohl (lower waterline) □ Covergirl Lashblast Mascara □ Lashes from Bornprettystore.com
BROWS: □ NYC Brow Pencil in Taupe □ NYC Browser Brow Kit □ MAC Carbon eyeshadow □ NYX Concealer in a Jar (shade beige)
□ The color of these lenses are a medium dark brown shade but it can look lighter depending on the lighting. I like to think of it as my eye color only bigger and better! These are extremely natural looking so if you're looking for brown lenses that are very natural, or something to enhance your brown eyes, then these are definitely a good choice.
COMFORT:
□ These went on easily and comfortably. I didn't have as many issues with these lenses as I did with others that I've tried. But as always, my eyes started to feel dry after a while of wear.
FINAL THOUGHTS:
□ I really like how these lenses give me that doe eyed look while still looking natural. These lenses are a nice way to enhance natural brown eyes because it doesn't alter too much of your eye color, though they might actually be a tad bit lighter. Either way I really like them and I would definitely use them again especially if I'm going for minimal makeup and I want have bigger and brighter eyes.
DISCLAIMER: IN NO WAY IS THIS BLOG ACCEPTING ANY FORM OF PAYMENT FOR PRODUCTS RECEIVED BY COMPANIES. THE PRODUCTS REVIEWED ON THIS BLOG ARE BASED ON THE OPINIONS AND EXPERIENCES OF THE AUTHOR. THE PRODUCTS IN THIS REVIEW WERE PROVIDED BY THE COMPANY.
Makeup primers are essential for anyone who wants their makeup to last longer and look better on their face. I'm not one to use primers all the time. I usually only use primers if I know I'm going to be out all day and I need my makeup to last for several hours. Other than that my face is usually fine without a primer. However, I do notice that I have pores on my cheek area close my nose. They're not extremely noticeable but up close you can definitely see them. In a primer I typically look for something that will help my foundation last longer but more importantly, I want it to create an even surface on my skin.
Without Primer / With Primer
L'Oreal True Match Foundation on top of Reviva Labs Makeup Primer
PRICE: $19.50 SIZE: 1 FL. OZ. / 29.5 ml VALUE FOR PRICE: 5/5 APPLICATION: 5/5 PACKAGING: 4.5/5 MEETS EXPECTATIONS: 4.5/5 OVERALL PRODUCT: 5/5
PROS: □ Diminishes the appearance of pores □ Creates a smooth surface for even foundation application □ Does not cause any breakouts □ Does not irritate the skin □ Makeup lasts longer than without it
CONS: □ Face starts to feel oily after 6-7 hours
FINAL THOUGHTS: □ Reviva Labs Makeup Primer really makes all the difference in my foundation application! I've tried quite a few high end makeup primers and none of them have given me noticeable results as this primer does for me. You can definitely see my pores in the before picture, and in the picture I took after applying the primer already shows my pores less visible. All I use is one pump and I apply it to the areas that I need it (middle of the forehead, nose, chin, and inner cheek area). I have visible pores on my nose and inner cheek area and this really makes my pores appear smaller. My foundation looks more flawless and my skin looks smoother. You have to make sure to shake the bottle really well first because when I first pumped out the primer it was runny and oily. It has a slippery texture to it and it has a slight silicone feel to it but not too much. If you're looking for a poreless primer then I definitely recommend this product!
DISCLAIMER: IN NO WAY IS THIS BLOG ACCEPTING ANY FORM OF PAYMENT FOR PRODUCTS RECEIVED BY COMPANIES. THE PRODUCTS REVIEWED ON THIS BLOG ARE BASED ON THE OPINIONS AND EXPERIENCES OF THE AUTHOR. THE PRODUCTS IN THIS REVIEW WERE PROVIDED BY THE COMPANY.