Connect

Showing posts with label LOOKS: Red. Show all posts

Monday, January 16, 2012

FOTD: Shimmering Suede Tutorial

I wanted to use one of my favorite MAC pigments and that's Blue Brown pigment. I was really hoping for the blue to show through, but because I added a bronze base it completely took that out. It's okay though because I'm really loving the warm red tones of the brown in this pigment. I think if the blue showed up, I would have loved this look a lot more. Anyway, I'm also wearing G&G circle lenses which I'll be reviewing soon along with other lenses. :)

MAC Blue Brown Pigment Swatch
Flash / No flash
Applied dry and wet


EYES:
□ Urban Decay Primer Potion
□ Maybelline Color Tattoo 24hr Eyeshadow in Bad to the Bronze (all over the lid)
□ MAC Blue Brown pigment (all over the lid & middle lower lash line)
□ MAC Coppering eyeshadow (above the crease)
□ Urban Decay Creep eyeshadow (outer corner & lower lash line)
□ Wet N Wild Vanity Palette - highlight color (brow bone highlight)
□ Urban Decay Sin eyeshadow (inner corner & inner lower lash line)
□ Milani Liquif'Eye Metallic Eyeliner in Black (lower waterline)
□ Covergirl Lashblast Mascara
□ Lashes from Kiwiberry style #11

BROWS:
□ NYC Browser Brow Kit
□ MAC Carbon eyeshadow

CHEEKS:
□ Elf Contouring Blush & Bronzing Powder

LIPS:
□ Maybelline Color Sensational Lipstick in Totally Toffee
□ Wet N Wild Glassy Gloss Lip Gel in This Too Shall Glass

Sunday, December 25, 2011

Christmas Inspired Makeup

I can't believe Christmas is over :( It went by so fast! All the anticipation and preparation felt so long and now it's over and done with. I wanted to post this look before Christmas but I couldn't get around to it. But anyone could pull off this color combo whenever they want, if they're nto bold and colorful looks! Anyway, New Years is just around the corner and I have a feeling it's gonna go buy just as quick as Christmas did. I know some of you are into bright colors and glitter for New Years so I'm hoping to get some looks before then. I only wish I can film tutorials for these looks but I'll see what I can do! Hope you all had a Merry Christmas! Enjoy the look! :)


EYES:
□ Urban Decay Primer Potion
□ MAC Painterly Paint Pot
□ Inglot #15 AMC Shine eyeshadow & Inglot #51 AMC eyeshadow (mixed together, transition color)
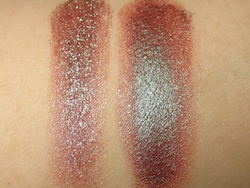
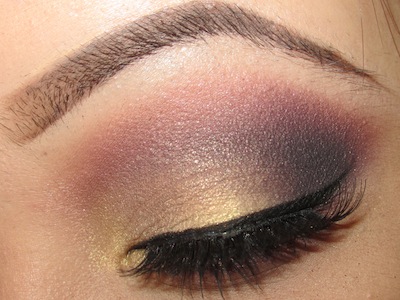
□ Inglot #450 Pearl eyeshadow (outer crease)
□ Inglot #60 AMC eyeshadow (lid color)
□ Glamour Doll Eyes Electric Lemonade eyeshadow (foiled on top of #60)
□ Wet N Wild Lust Palette - dark matte purple eyeshadow (outer corner & crease)
□ MAC Carbon eyeshadow (outer corner)
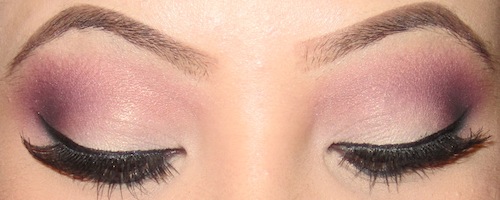
□ Wet N Wild Lust Palette - highlight color (brow bone highlight)
□ Inglot #403 Pearl eyeshadow (inner tear duct)
□ Glamour Doll Eyes Shamrock eyeshadow & Inglot #498 DS eyeshadow (mixed together, lower lash line)
□ Maybelline Eye Studio Lasting Drama Gel Liner (upper lash line)
□ Milani Liquif'Eye Metallic Eyeliner (lower waterline)
□ Maybelline Falsies Flared mascara
□ Model 21 Lashes #12

BROWS:
□ NYC Brow Pencil in Taupe
□ NYC Browser Brow Kit
□ NYX Concealer in a Jar (shade beige)

CHEEKS:
□ Milani Luminoso Baked Blush
□ ELF Fuchsia Fusion Blush

LIPS:
□ OCC Anime Lip Tar & MAC Smolder Eye Kohl applied as liner (mixed together)

Saturday, November 26, 2011

Thanksgiving Look

I hope you all enjoyed your Thanksgiving filled with food, friends, and family! :) I woke up around 2:30pm today (Friday) because I was out around midnight to 5am doing some Black Friday shopping with my mom. We wasted so much time just standing in line just to pay for our things. It was such a hassle. My feet were hurting so bad and I had a headache. Good thing I was feeling better throughout the day for me and boyfriend to go shopping as well. I didn't buy that much though. I'm not that crazy over Black Friday because I hate dealing with crowds and crazy shoppers who are willing to beat each other up just to get through. My mom and I had just gotten to the mall around 12:45am and these grown men were literally about to fight each other for some reason. I was just amazed how this single day of shopping can cause so much chaos. That's why I rather shop online. :)

So this is the look I wore for Thanksgiving. It could almost pass for a Christmas look :)  I ended up changing the lip color to a lighter pink but I should have stuck with the bold lip since I think it looked better. I also wish the green on the lower lash line was more vibrant but I was in a rush to do this look and I didn't get to fix it. Anyway thanks again for reading! I hope you all enjoy the rest of the weekend. :D


EYES:
 Urban Decay Primer Potion
 MAC Painterly Paint Pot
 Glamour Doll Eyes Chocoholic eyeshadow (applied wet all over the lid)
 Inglot #74 AMC eyeshadow (crease)
 MAC Brule eyeshadow (brow bone)
 MAC Saddle eyeyeshadow (transition color)
 Inglot #418 Pearl eyeshadow (lower lash line)
 Wet N Wild white eyeliner pencil (inner tear duct)
 MAC Beautiful Iris eyeshadow (inner tear duct)
 MAC Smolder eye kohl (lower waterline)
 Maybelline Eye Studio Lasting Drama Gel Liner (upper lash line)
 Maybelline Falsies Flared mascara
 Model 21 Lashes No.3

BROWS:
 NYC Brow Pencil in Taupe
 NYC Browser Brow Kit

CHEEKS:
 NARS Laguna Bronzer
 Elf Fuchsia Fusion blush

LIPS:
 MAC Rougette mattene lipstick (limited edition)

Thursday, October 27, 2011

LOOK: Smokey Teal with a Pop of Red + Tutorial

This look is actually an inspired and recreated look of YouTube Guru Jazziebabycakes' Painted Lady tutorial. She's super talented and I'm a huge fan of her work and when I was browsing through her videos I fell in love with this so I decided to do my rendition of it. I think it came out a little bit sloppy (compared to hers). It was really late and my eyes kept watering but I kept going! I had a lot of fun doing this look because it's definitely something that I'm not used to. But it's nice to step out of my comfort zone every now and then. :) Thanks for reading! Enjoy! :)


EYES:
□ Urban Decay Primer Potion
□ MAC Otherworldly Paint Pot (LE)
□ Inglot 65 AMC eyeshadow (inner and outer corners)
□ Inglot 372 Matte eyeshadow (middle lid area and outer lower lash line)
□ MAC Shimmermoss eyeshadow (middle lid area)
□ Inglot 495 DS eyeshadow (inner brow bone area)
□ MAC Bitter eyeshadow (inner lower lash line)
□ MAC Blanc Type eyeshadow (brow bone)
□ Milani Liquif'Eye Metallic Eyeliner in Black (lower waterline)
□ Wet N Wild Creme Liner in Black (upper lash line)
□ Covergirl Lashblast mascara
□ Model 21 lashes No.3

BROWS:
□ NYC Brow Pencil in Taupe
□ NYC Browser Brow Kit

CHEEKS:
□ NARS Laguna Bronzer
□ Elf Fuchsia Fusion Blush

LIPS:
□ NYX Tea Rose lipstick
□ NYX Soap Opera Queen lipgloss

Tuesday, September 13, 2011

Quick Post: Inspired EOTD


I did this look merely for fun because I wanted to step out of my comfort zone because it's been a while since I pulled off a bright color like this. I was really inspired by Fashionista804 on YouTube. I'm not sure what she used exactly but I just decided to use whatever shadows I had on hand. This was taken on my iPhone through the Instagram app (Follow me! Username: damnyoufine). The blue came out really bright and I almost didn't want to walk out my house with it on because it's just been so long since I've done something like this. But I thought that if other people were brave enough to do it then I should too. What better way to express my love for my makeup than to go bold, right? Anyway, I just thought I would share it here as well since I really like how it came out. :) Sorry I don't have any real pictures to show off this look. I really didn't plan on blogging about it.

Products Used:
Blanc Type on the entire lid
MAC Off the Radar pigment [LE] applied to the crease (any burnt orange color will work)
MAC Coppering eyeshadow applied right over the orange to give it more warmth
Urban Decay Electric eyeliner applied to the lower lash line and lower waterline
Inglot #371 matte eyeshadow applied on top of the liner to set it
Wet N Wild Creme Liner
False eyelashes from Bornprettystore.com Style #004

Sunday, September 11, 2011

Warm Eyes For Fall

I haven't done a tutorial in a while and I knew I wanted this next one to be fall inspired so this is the look I came up with the other day. I would consider it a subtle smokey eye since it's not fully smothered in black eyeshadow but you can definitely smoke it out a lot more for more drama. I'm really looking forward to this fall season. As much as I love Summer, there's no better feeling than getting cozy and warm than feeling hot and sweaty. Haha! Anyway, more fall/smokey looks should be coming up soon so stay tuned! :)


EYES:
UDPP in Eden
MAC Off the Radar pigment
Inglot #450 Pearl eyeshadow
MUFE #92 eyeshadow
Inglot #403 Pearl eyeshadow
MAC Carbon eyeshadow
MAC Blacktrack Fluidline
AK Brand false eyelashes style #601

BROWS:

NYC Brow Pencil in Taupe
NYC Browser brow kit

CHEEKS:
NARS Laguna blush
MAC Marine Life highlight powder

LIPS:
Revlon Nude Attitude lipstick
MAC Mimmy lipglass

Saturday, September 3, 2011

Summer to Fall Transitional Look

For some of you who are still in school, Summer may be over for you now. I'm more of a literal person so Summer isn't technically over for me until September 23rd, but I am looking forward to this Fall season. I'm over this San Diego heat and I'm ready to wear my boots, cardigans, and scarves again. I like doing looks based on what season it is but I don't usually abide by this rule all the time. However, I tend to do more colorful looks in the Spring and Summer and more smokey looks in the Fall and Winter.

I did this look not knowing whether to do a Summer look or a Fall look so I decided to do an "inbetweenie". So I went for something a little bit smokey but still had a playful color to it. This look was completely done unintentionally. I didn't plan any colors ahead of time so I used a variety of colors from different brands of makeup I have. Hope you all enjoy it. Thanks! :)


EYES:
UDPP in Eden
MAC Painterly paint pot
MAC Expensive Pink eyeshadow applied above the crease
Inglot 51 AMC eyesahdow applied above the crease
Sugarpill Love+ eyeshadow applied to the outer corner
MAC Fig 1. eyeshadow applied to the outer corner
MAC Carbon eyeshadow applied to the outer corner
MAC Brule eyeshadow applied to the lid
Inglot 08 AMC Shine eyeshadow applied to the center eyelid
MAC Blacktrack Fluidline
MAC Smokder eye kohl applied to the lower lash line
Covergirl Lashblast mascara
Miss Adoro lashes #82

BROWS:
NYC Brow Pencil in Taupe
NYC Browser brow kit

CHEEKS:
NARS Laguna blush
NYX Mocha blush

LIPS:
NYX Tea Rose lipstick
MAC Nice Kitty lipglass (Hello Kitty collection, discontinued)

Thursday, July 7, 2011

Sunset Eyes Tutorial

Here's a look and a tutorial I did using Inglot eyeshadow. I was inspired by my girl Beverly from fullybeatable.com. But of course, my look didn't come out nearly as great as hers. Plus I did this all for fun and it's my first live tutorial since I've made a comeback on YouTube!!!! Keep in mind I was extremely nervous and I wasn't sure if I was going to even upload it but I hate letting a good look go to waste. So please be kind and don't criticize me too much! But if you all can do me a favor, let me know if the voiceover works out okay for you guys. Let me know if it's too loud or if the background music is too loud. Or if it's just fine, let me know anyway! Your feedback is much appreciated. :)


EYES:
Urban Decay Primer Potion in Eden (primer)
MAC Painterly Paint Pot (base)
Inglot AMC 60 (inner eyelid)
Inglot Matte 362 (middle eyelid)
Inglot Matte 366 (outer eyelid)
Inglot Matte 361 (above crease)
Inglot Pearl 450 (outer corner)
Inglot Matte 352 (brow bone)
Inglot Matte 371 (lower lash line)
Urban Decay 24/7 Glide-On Eye Pencil in "Electric"
Urban Decay 24/7 Glide-On Eye Pencil in "Zero"
Maybelline Eye Studio Lasting Drama Gel Eyeliner
Revlon Grow Luscious Mascara

CHEEKS:
NYX Blush in "Pinched"

LIPS:
MAC Flowerplay lipstick