Connect

Showing posts with label LOOKS: Simple. Show all posts

Tuesday, February 19, 2013

Urban Decay Naked Basics Palette Everyday Smokey Eyes

I have been getting a TON of requests to do Urban Decay Naked palette tutorials on YouTube. Not specifying which palette to use, I decided to go in with the Basics palette since it's still fairly new to me. I will be doing more looks using the original Naked palette and the Naked 2 palette since I had to take some of the videos off of YouTube due to copyright issues. Ugh! Anyway, here is a really simple everyday smokey eye using the Basics Palette. This looks is really fresh and I love how Venus eyeshadow makes my inner corners pop! Can't wait to do more tutorials with this palette. I need to go harder with more dramatic smokey eyes so that's coming up soon! Stay tuned! For the meantime I hope you all enjoy this look. Thanks for looking!


Urban Decay Primer Potion
MAC Soft Ochre Paint Pot
Revlon Colorstay liquid eyeliner
Maybelline The Rocket mascara

 Benefit Hoola bronzer
Milani Luminoso blush

L'Oreal Fairest Nude lipstick
MAC Summer Sweetheart lipglass

Saturday, February 9, 2013

Urban Decay Naked Basics Palette Look & Tutorial

Hey guys! Here's a really simple and natural look with bold lips featuring my Urban Decay Naked Basics Palette. This is most likely going to be my Valentine's Day look this year since I'm looking forward to wearing bold lips. Being festive for Valentine's Day isn't all about dressing up the eyes and that's what I felt like going for in this look. If you're curious to know what I'm wearing on the lips, I'm wearing Maybelline Vivids lipstick in Shocking Coral in the first picture and Vivid Rose (my favorite!) in the other. This look will go perfectly with red lips too, or even soft pink lips if you're too afraid to go bold. Either way I hope you all enjoy the look and the tutorial! :)


Monday, December 12, 2011

Simple Holiday Makeup

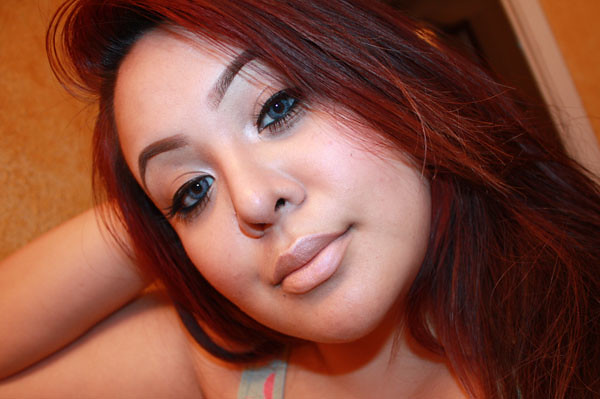
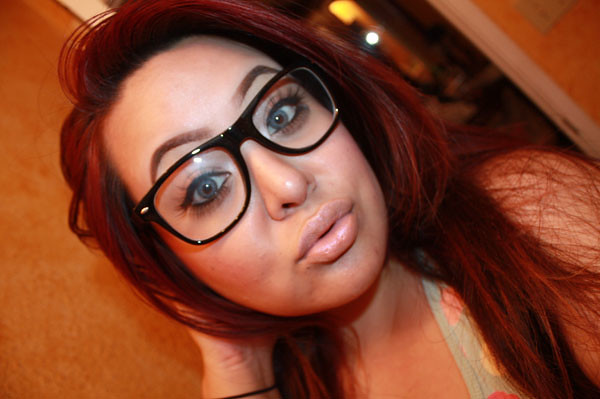
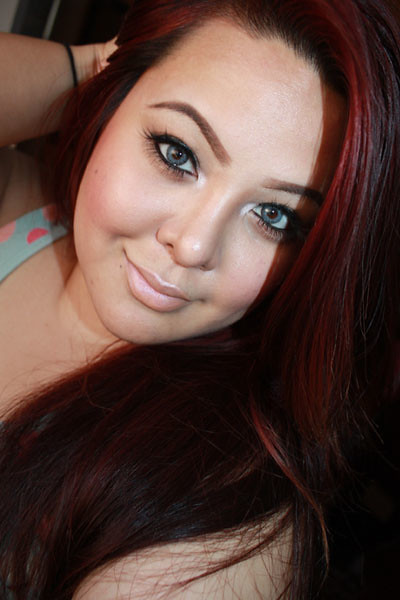
Here's a simple eye look paired with a bright red lip that you can do for the Holidays. I actually wore this look when my boyfriend and I were doing some shopping over the weekend but I figured that some of you may be looking for makeup looks to do for a Christmas party or some sort of winter look to do with red lips. So this doesn't have to be a look just for the Holidays :) I have a tutorial for the eye makeup coming up but I'm in the process of editing it right now so that will be posted soon after this.
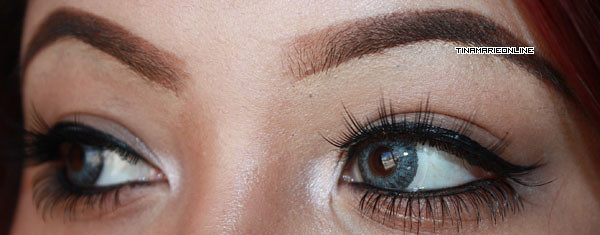


EYES:
 Urban Decay Primer Potion
 MAC Painterly Paint Pot
 Inglot #351 Matte (brow bone)
 Inglot #337 Matte (crease)
 MAC Romp eyeshadow (outer crease)
 Inglot #453 Pearl (eye lid)
 Inglot #63 AMC (outer corner & outer lower lash line)
 Wet N Wild White eyeliner (inner tear duct)
 MAC Silver Fog pigment (inner tear duct)
 Wet N Wild Creme Eyeliner
 Urban Decay 24/7 eyeliner in Midnight Cowboy (lower waterline)
 Inglot #12 AMC Shine (lower lash line)
 Covergirl Lashblast Mascara
 Model 21 Lashes style No.3

BROWS:
 NYC Brow Pencil in Taupe
 NYC Browser Brow Kit
 NYX Concealer in a Jar in shade Beige

CHEEKS:
 NARS Laguna Bronzer (contour)
 MAC Gingerly blush

LIPS:
 NYX Deep Red lip pencil
 MAC Ruby Woo lipstick

Sunday, November 13, 2011

Retro Pinup Look

Of all the years of my blogging I have never done a pinup look. I've always been a huge fan of it though. Everything from the makeup, hair, and fashion has always piqued my interest. Mostly the hairstyles though.. but too bad I can't style hair. I love the Victory Roll hairstyle on pinups and I could never get it right. Oh well... ;p


EYES:
□ NYX Jumbo Eyeshadow Pencil in Milk (base)
□ Wet N Wild Vanity and Greed Palette (crease and highlight)
□ Sugarpill Tako eyeshadow (lid)
□ Wet N Wild Creme Liner (lash line)
□ Wet N Wild White eyeliner (lower waterline)
□ Covergirl Lashblast mascara

BROWS:
□ NYC Brow Pencil in Taupe
□ NYC Browser Brow Kit
□ Black eyeshadow

CHEEKS:
□ NARS Laguna Bronzer (contour)
□ MAC Prism Blush

LIPS:
□ MAC Redd Lip Pencil (liner)
□ NYX Femme Round Lipstick

Wednesday, November 2, 2011

Fall Trend: Bold Lips (Mixing Lip Colors)

Wearing bold lips is just as fun as wearing dramatic eyes. It's nice to step away from your basic smokey eye for Fall and replace it with a bold lip instead. It's also fun to custom make your own lip colors (I do this all the time) into a new shade for you to wear and that's what I did for this lip color.

I wanted a really deep, dark red, plummy lip color so I decided to combine Wet N Wild Vamp It Up and Red Velvet Mega Last Lip Color. Vamp It Up is definitely a difficult color to pull off if it's not Halloween. That's why I paired it with another color to make it more appropriate for daily wear!

I also wanted to keep the eyes very minimal since the lips were the main focus of the look. That's why I went with really soft eyes with barely any color in my crease, clean winged eyeliner, and wispy lashes. :)

Vamp It Up, Red Velvet

Red Velvet + Vamp It Up = Perfect vampy lips!


EYES:
□ MAC Painterly Pot
□ MAC Saddle eyeshadow (crease)
□ MAC Blanc Type eyeshadow (lid)
□ MAC Tempting eyeshadow (lower lash line)
□ MAC Carbon (outer lower lash line)
□ Wet N Wild Creme Eyeliner
□ Random false eyelashes

BROWS:
□ NYC Brow Pencil in Taupe
□ NYC Browser Brow Kit

CHEEKS:
□ MAC Gingerly blush

LIPS:
□ Wet N Wild Vamp It Up lipstick
Wet N Wild Red Velvet lipstick

Saturday, October 22, 2011

Achieve the Look: Peachy Golden Brown EOTD

I just got home from a night out and I'm really tired but I thought I would push this out of the way before I go to sleep. This is my eye makeup I wore tonight. I wanted something subtle but I didn't want to go with basic browns and neutrals. I didn't feel like putting any effort into a smokey eye either so I decided to go with some golds and browns with a pop of shimmery coral in the inner third. My camera has a hard time picking up shimmers and light colors so it looks really washed out! I had to play with the contrast a little bit when I was cropping the pictures.

Since I was in a rush to do this look I didn't have time to take any full face shots. But in case anyone is wondering, I paired it with Elf Pink Kiss gloss with NARS Laguna bronzer and MAC Blonde MSF on the cheeks. I'll put down the list of eyeshadows some time tomorrow because right now I don't have them memorized. I'm just so ready for bed! Have a great weekend everyone! :)


Achieve the look:

Saturday, September 24, 2011

Classic Red Lips with Simple Eye Makeup

I decided to go with really simple eyes the other day because I wanted to play up my lips. At first I had a really pretty deep fuchsia lip color that I customized myself mixing a purple and red lipstick (gotta remind myself to use this lip color for future looks, it's really pretty!). Then I decided to go with a classic red lip for the night out. Super simple and very easy to do! I don't usually pull off red lips or bold lips for that matter. Hopefully I've pulled it off! :)


EYES:
□ MAC Painterly Paint Pot
□ MAC Brule eyeshadow (all over the lid up to the brow bone)
□ MAC Soft Brown eyeshadow (crease)
□ MAC Carbon eyeshadow (outer corner applied lightly)
□ Maybelline Eyestudio Gel Liner
□ Wet N Wild Vanity Palette (dark brown shade applied on the lower lash line)
□ Milani Liquif'eye Eyeliner in black (smudged on outer lower lash line)
□ Model 21 Lashes #19
□ Covergirl Lashblast mascara

BROWS:
□ NYC brow pencil in Taupe
□ NYC Browser brow kit

CHEEKS:
□ MAC Emote blush
□ MAC Hipness blush
□ MAC Iridescent Pressed Powder in Delicacy

LIPS:
□ MAC Red lip pencil
□ MAC Ruby Woo lipstick

Monday, August 22, 2011

Video Tutorial: Back To School/Work Look

Even though I'm not technically going back to school I thought this look would be good for those who are. Especially if you're a teenager and you're looking for an everyday look that's simple and clean. This can also be your basic everyday look if you're not going to school or a look for going to work. This look is very easy to do and you can substitute a lot of colors that I used. You can also darken it up a little bit to make it a little more smokey by applying a darker brown or black eyeshadow to the outer corner. It's totally up to you! Have fun with this look if you decide to try it out. Enjoy! :)


EYES:
UDPP in Eden
MAC Painterly Paint Pot
MAC Sketch eyeshadow
MAC Blanc Type eyeshadow
MAC Embark eyeshadow
MAC Nylon eyeshadow
MAC Brule eyeshadow
MAC Carbon eyeshadow
MAC Blacktrack fluidline
Milani Liquif Eye eyeliner
False eyelashes from Eye's Chic Style 461

CHEEKS:
MAC Ambering Rose blush

LIPS:
MAC Viva Glam VI lipglass

Tuesday, March 1, 2011

Not An EOTD :)

Hello! New layout! I'm still in the process of editing this layout so bare with me as I am not HTML or CSS savvy! Anywho, I can't remember the last time I actually played with makeup. I haven't really had the time to make any looks that are worth posting on my blog. They've all just been simple EOTD's like I have posted here. How boring, right? But today I figured that I should post something ... anything !! Especially since I haven't been around that much lately. Anyway, hopefully I can get back into the swing of things soon. February has been a hectic month for me so hopefully all of that can change with time. So here I am camera whoring with my dog Toby! He looks a little scared in the pictures but that's because I was in front of a window and he was looking out into the street at cars passing by lol. I'll talk to all of you later! :)


Please excuse my huge FIVEhead!

My little bear, Toby. He's a Pomeranian mix with something. I can't remember!

Thursday, August 12, 2010

Doll Eyed Look Using Lash Royalty

My dog chewed up my memory stick for the camera that I usually use to take my makeup looks with so I had to settle for my bulky DSLR which sucks because even though it takes amazing pictures, it's not user friendly when I'm trying to take pictures of eye closeups and what not. So I did my best to take as good enough pictures I can with what I had.

Anyway, if you read my last post, you know that I received some false eyelashes from LashRoyalty and it included these short stubby lashes which looked like they were meant for your lower lash line. Today I decided to play around with it since I've NEVER tried putting lashes on my lower lash line before. For an Asian girl, my lower lashes are fairly long but I still wanted to give this a try.

I kept it totally natural. No eye makeup whatsoever except eyeliner and a highlight color on the inner corners just to make my eyes pop. Other than that, I just let the lashes do all the work. Anyway, I tried to make this as dolled up as I can. I even threw in my contact lenses to really make them pop. I'm wearing Fresh Look lenses in Sterling Grey, if anybody is curious.

TOP LASHES: MISS CHERIE
BOTTOM LASHES: DUCHESS