Connect

Showing posts with label LOOKS: Neutrals. Show all posts

Tuesday, February 19, 2013

Urban Decay Naked Basics Palette Everyday Smokey Eyes

I have been getting a TON of requests to do Urban Decay Naked palette tutorials on YouTube. Not specifying which palette to use, I decided to go in with the Basics palette since it's still fairly new to me. I will be doing more looks using the original Naked palette and the Naked 2 palette since I had to take some of the videos off of YouTube due to copyright issues. Ugh! Anyway, here is a really simple everyday smokey eye using the Basics Palette. This looks is really fresh and I love how Venus eyeshadow makes my inner corners pop! Can't wait to do more tutorials with this palette. I need to go harder with more dramatic smokey eyes so that's coming up soon! Stay tuned! For the meantime I hope you all enjoy this look. Thanks for looking!


Urban Decay Primer Potion
MAC Soft Ochre Paint Pot
Revlon Colorstay liquid eyeliner
Maybelline The Rocket mascara

 Benefit Hoola bronzer
Milani Luminoso blush

L'Oreal Fairest Nude lipstick
MAC Summer Sweetheart lipglass

Saturday, February 9, 2013

Urban Decay Naked Basics Palette Look & Tutorial

Hey guys! Here's a really simple and natural look with bold lips featuring my Urban Decay Naked Basics Palette. This is most likely going to be my Valentine's Day look this year since I'm looking forward to wearing bold lips. Being festive for Valentine's Day isn't all about dressing up the eyes and that's what I felt like going for in this look. If you're curious to know what I'm wearing on the lips, I'm wearing Maybelline Vivids lipstick in Shocking Coral in the first picture and Vivid Rose (my favorite!) in the other. This look will go perfectly with red lips too, or even soft pink lips if you're too afraid to go bold. Either way I hope you all enjoy the look and the tutorial! :)


Wednesday, January 16, 2013

Lorac Pro Palette Tutorial

Here's a tutorial for the look I wore the other day using my Lorac Pro Palette. I've been using this palette pretty religiously for doing neutral and smokey eyes. My next tutorial will be more of an evening look so stay tuned for that! Hope you all enjoy the look and the tutorial. Subscribe to my YouTube channel if you haven't already and follow me on Instagram! :)


CHEEKS:
- MAC Blunt blush to contour
- MAC Peaches blush on the apples of the cheeks

LIPS:
- MAC Honeylove lipstick
- Kryolan High Gloss Lip Shine in Toffee


Sunday, March 4, 2012

Urban Decay Naked Palette Look - Tutorial

So here's a look and a tutorial for you all using Urban Decay's Naked Palette. I realize it's pretty similar to my first Urban Decay Naked 2 Palette tutorial but I know not everyone has that palette which is why I wanted to do one similar with the Naked 1 Palette. I get requested on Youtube to do more tutorials with the Naked Palettes so hope you all like it. Thanks for reading :)


EYES:
□ Urban Decay Primer Potion
□ MAC Painterly Paint Pot
□ Sin eyeshadow (inner corners & inner lower lash line)
□ Toasted eyeshadow (middle lid & middle lower lash line)
□ Hustle eyeshadow (outer corner & outer lower lash line)
□ Creep eyeshadow (outer corner & outer lower lash line)
□ Buck eyeshadow (transition & crease color)
□ Foxy eyeshadow - Naked 2 Palette (brow bone highlight)
□ Elf Black Cream Eyeliner
□ Covergirl Lashblast Mascara
□ ES False Eyelashes - style A510

BROWS:
□ NYC Browser Brow Kit
□ MAC Carbon eyeshadow
□ NYX Concealer in a Jar (shade beige)

CHEEKS:
□ Wet N Wild Color Icon Bronzer in Princess
□ NYX Mauve blush

LIPS:
□ NYX Round Lipstick in Thalia

Wednesday, December 28, 2011

Urban Decay Naked Palette Look - Simple Wearable Makeup

I'm back again with another look using my UD Naked Palette. I actually did this look a few days ago but I wanted to space out all these neutral looks I had coming up. This one is very easy to do and I don't even think you need this particular palette to do this look. I find it really subtle and work appropriate for those who are looking for ways to do their makeup without over doing it.

This look can also be transformed from a day to night look just by emphasizing the outer corner and crease with a dark brown eyeshadow (Darkhorse) or black eyeshadow (Creep). I wanted to keep it simple though. Hope you like it!


EYES:
□ Urban Decay Primer Potion
□ MAC Bare Study Paint Pot
□ Buck eyeshadow (crease & transition color)
□ Sidecar eyeshadow (inner half of eyelid & inner lower lash line)
□ Sin eyeshadow (outer half of eyelid)
□ Darkhorse eyeshadow (outer corner & crease)
□ Creep eyeshadow (outer corner & outer lower lash line)
□ MAC Studio Finish Concealer (brow bone highlight)
□ Wet N Wild Creme Liner (upper lash line)
□ Maybelline Falsies Flared Mascara
□ Model 21 Lashes #12

BROWS:
□ NYC Brow Pencil in Taupe
□ NYC Browser Brow Kit
□ MAC Carbon eyeshadow
□ NYX Concealer in a Jar (shade beige)

CHEEKS:
□ Milani Luminoso Blush

LIPS:
□ NYX Tea Rose Round Lipstick
□ L.A. Colors Jelly Bean Sheer Tube Lipgloss

Friday, December 16, 2011

Bestie's Graduation Makeup

Why does it still feel like October to me?! Then I think about it and we're already almost halfway through December! Time flies and we're only 9 days away till Christmas and I'm not ready! Well TGIF! This week felt like it was going by really slow for some reason but I'm just glad the weekend is here. I need to finish up some Christmas shopping and I gotta find a new dress to wear for Christmas Eve. I only wish time can slow down just a little bit!

I was really excited when my amazingly gorgeous best friend asked me to do her makeup for her graduation! I've never done her makeup before and I always knew she was good with makeup already :) But of course I couldn't say no and I thought this would be a good chance for me to practice more on different faces especially since she has more of a monolid which is the opposite of what I have.

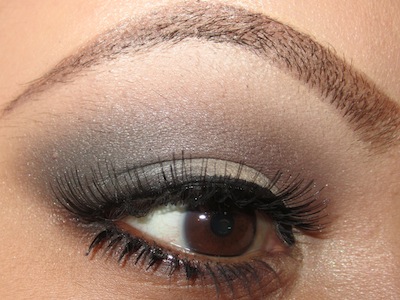
After I got the feel of where her crease was, it was pretty easy to emphasize it. She wanted a subtle brown smokey look but nothing too dramatic. In my opinion I feel like this is how she normally looks while others thought she looked different. Either way, she was the hottest college graduate that day :D


FACE:
□ MAC Studio Fix Fluid
□ MAC Studio Finish Concealer
□ MAC Prep + Prime Transparent Finishing Powder
□ Benefit Ooh La Lift (under eye)
□ MAC Fix+ (finishing spray)

EYES:
□ Urban Decay Primer Potion
□ MAC Painterly Paint Pot
□ Inglot #351 Matte eyeshadow (brow bone highlight)
□ Inglot #360 Matte eyeshadow (crease and transition color)
□ Inglot #07 AMC Shine eyeshadow (lid color)
□ Inglot #08 AMC Shine eyeshadow (lid color)
□ Inglot #52 AMC eyeshadow (outer corner)
□ MAC Carbon eyeshadow (outer corner)
□ Wet N Wild Creme eyeliner
□ Milani Liquif'Eye Metallic Eyeliner Pencil in Black (lower waterline)
□ Covergirl Lashblast Mascara
□ Brownprettystore false eyelashes styles #890

BROWS:
□ NYC Browser Brow Kit
□ NYX Concealer in a Jar (shade beige)

CHEEKS:
□ NARS Laguna bronzer (contour)
□ Elf Pink Passion blush
□ MAC New Vegas Mineralize Skin Finish (highlight)

LIPS:
--


Wednesday, November 16, 2011

Sparkling Gold and Brown Makeup Look

I've been on a neutral kick lately ever since I stocked up on my Inglot eyeshadows. If you're from San Diego and you don't follow my Facebook page then you probably missed my comment about a new Inglot counter opening inside Macy's at Fashion Valley (*squeals in excitement!!!) I was actually in Irvine visiting family last week and I decided to make a stop at the Inglot store in Newport Beach. That was when I first heard they just opened a new counter in San Diego. I was so excited that a Macy's over here was one of the select stores that was opening a new Inglot counter! On another note I got my Inglot Pro card :D This card offers 20% off on their cosmetics. The downside to this is that they don't accept it at counters, only at Inglot freestanding stores, through telephone, and I'm not sure about online but possibly so! I'm happy to have it either way! :D

Anyway! Here is a really quick and easy look I did the other day. I wanted to do something neutral, that's why I decided to stick with lighter shades of golds and browns, but still adding a pop of shimmer to keep it looking radiant (it's one of my favorite ways of making your eyes look brighter). Thanks for reading. Enjoy! :)


Natural lighting


EYES:
□ Urban Decay Primer Potion
□ MAC Painterly Paint Pot
□ Inglot #337 Matte (crease)
□ MAC By Jupiter mineralize eyeshadow - limited edition - (outer corner and crease)
□ Inglot #08 AMC Shine (inner eyelid)
□ Inglot #07 AMC Shine (outer eyelid)
□ Wet n Wild Vanity Palette
□ MAC Gold Mode pigment (inner lower lash line)
□ Urban Decay 24/7 eyeliner in Perversion
□ Wet n Wild Creme Liner
□ False lashes from bornprettystore.com (style #004)

BROWS:
□ NYC Brow Pencil in Taupe
□ NYC Browser Brow Kit

CHEEKS:
□ NYX Terra Cotta blush

LIPS:
□ MAC 4N lipstick
□ MAC Viva Glam V lipglass

Sunday, November 13, 2011

Retro Pinup Look

Of all the years of my blogging I have never done a pinup look. I've always been a huge fan of it though. Everything from the makeup, hair, and fashion has always piqued my interest. Mostly the hairstyles though.. but too bad I can't style hair. I love the Victory Roll hairstyle on pinups and I could never get it right. Oh well... ;p


EYES:
□ NYX Jumbo Eyeshadow Pencil in Milk (base)
□ Wet N Wild Vanity and Greed Palette (crease and highlight)
□ Sugarpill Tako eyeshadow (lid)
□ Wet N Wild Creme Liner (lash line)
□ Wet N Wild White eyeliner (lower waterline)
□ Covergirl Lashblast mascara

BROWS:
□ NYC Brow Pencil in Taupe
□ NYC Browser Brow Kit
□ Black eyeshadow

CHEEKS:
□ NARS Laguna Bronzer (contour)
□ MAC Prism Blush

LIPS:
□ MAC Redd Lip Pencil (liner)
□ NYX Femme Round Lipstick

Sunday, September 25, 2011

Quick Post: Subtle Smokey EOTD


Here's another quick eye look I did the other day that I snapped with my iPhone. This whole weekend I've been going out with really simple or neutral eye makeup and this is what I had on yesterday. I ended up really loving this look because of the fact that I played it safe on the "smokey" part. I usually go all out on smokey eyes so I was really pleased by going subtle on it. I'm thinking of doing a tutorial on it. We'll see! Happy Sunday everyone. :)

Products Used:
UDPP in Eden
MAC Brule eyeshadow (entire lid and brow bone)
MAC Saddle (crease)
MAC Smolder eye kohl (applied to the outer "V" & smudged with a pencil brush)
MAC Carbon eyeshadow (outer corner)
Maybelline Eyestudio gel liner
Model 21 lashes #19
Covergirl lashblast mascara

Friday, August 26, 2011

AK Brand False Eyelashes From KKCenterHk

True story: false eyelashes are my best friend! Haha :) Anyway, I'm starting to get used to the look of wearing top and bottom lashes together. I still don't pull off this look nearly enough as I'd like to but I really love the look of full lashes.

AK Brand lashes are from Taiwan and are 100% handmade. Each box comes with 5 pairs of lashes. They have a variety of both top and bottom lashes ranging in different styles. You can purchase these lashes at KkCenterHk for $12.50(USD) a box.


Style: #601

Style: #601

These lashes are very similar to other ones I've tried (but I forgot which brand they were). These lashes are wispie and very comfortable! I really love lashes that have invisible bands like this because I feel like it stays put on my eyes longer than other lashes with thicker bands. It also feels more natural because they're not heavy on the eyes. They flare out nicely wear the inner corner is shorter compared to the outer corner. To me these are more of my idea of "natural" lashes so I would definitely wear these on a regular basis. They're not too short or too long so it's just right if you're looking for something simple yet elegant.

Style: #682B (bottom lashes)

Style: #682B (bottom lashes)

These bottom lashes are short and thick and comfortable to wear. Again, I prefer lashes with invisible bands because it feels lighter and feels like you're not wearing anything. Other bottom lashes made my eyes feel stiff but these bottom lashes are definitely the most comfortable. As always, I cut the bottom lashes in half because I like the look of thicker lashes more towards the outer half but you could very much use the entire band if you wanted to. 


DISCLAIMER: In no way is this blog accepting any form of payment for products received by companies. The products reviewed on this blog are based on the opinions and experiences of the author. The products in this review were provided by the company.