Connect

Showing posts with label Hair. Show all posts

Thursday, May 3, 2012

Hair Therapy Wrap Product Review

Hi everyone! Today I have a hair care product to review for you all. The Hair Therapy Wrap is great for people who are into using deep conditioners, hot oils, scalp treatments or if you are just looking for an innovative way to restore your hair. I also read that it can be used to activate hair dye! I have never thought of trying this for hair dyes but maybe someday!

I have never heard of this product before and I thought it was really interesting because it reminded me a lot of childhood. (I'm about to go off topic right now.. lol) I remember growing up as a kid I remember seeing my mom use hot oils in her hair. She would put a damp towel in the microwave and wrap her damp hair in it after applying her hot oils. She would then place a plastic bag over her head! So when I started to use this wrap I couldn't help but think of my mom and how much I think she would have loved this product if she knew about it back then. :)

Anyway, as I was saying.. I have been using the Hair Therapy Wrap for about 2 months now and I would use different hair care products from deep conditioners to hot oils. I don't use this wrap that often but I would say I've used this about four times since I've gotten it and I really enjoy using it! My favorite part is rinsing out my hair and being able to run my fingers through it because of how smooth it is! It's kind of rewarding. :)

The Hair Therapy Wrap is intended to be worn up to 20 minutes. I would take full advantage of those 20 minutes especially if you experience dry, brittle hair like I do.. or if you hair is really long line mine. The longer the better. :)

The Hair Therapy Wrap includes:
□ Reusable heated hair wrap
□ Three gel packs
□ Three disposable plastic caps


PROS:
□ Helps deep conditioners penetrate your hair more deeper because of the use of heat.
□ Perfect for all hair types
□ Stays warm for about 20 minutes
□ Reusable
□ Gel packs can be heated in the microwave or in boiling water (I prefer microwave!)
□ Affordable! I know to some it might seem more than what you would want to spend on a hair care product but you get so many uses out of it so I think it is well worth the investment.

CONS:
□ A little bit uncomfortable
□ Feels pretty snug especially if you have a lot of hair like I do.. or I must have a really big head :\

FINAL THOUGHTS:
□  I have noticed my hair looking and feeling a lot more silkier and a lot more shinier. Some might think that this is caused by using a deep conditioner. I do believe that the deep conditioner has been a contributing factor to the overall health of my hair. On the other hand, I did experience my hair feeling healthier for a longer period of time and for that reason I believe was because of the use of the Hair Therapy Wrap. I like the fact that this is meant for all hair types and textures so I think that everyone can take full advantage of this product because all hair can use a little bit love!

Available at Brushlove.com for $29.95

DISCLAIMER: IN NO WAY IS THIS BLOG ACCEPTING ANY FORM OF PAYMENT FOR PRODUCTS RECEIVED BY COMPANIES. THE PRODUCTS REVIEWED ON THIS BLOG ARE BASED ON THE OPINIONS AND EXPERIENCES OF THE AUTHOR. THE PRODUCTS IN THIS REVIEW WERE PROVIDED BY THE COMPANY.

Thursday, November 3, 2011

HANA Titanium Ionic Flat Iron 1.5" Review


I was very fortunate to try another flat iron from Hana. The first one I tried I had won from a giveaway and I love using that for curling my hair since it's a perfect size (1 inch). This one is a bit larger (1 1/2 inch) so this one is slightly easier to straighten my hair but you could also use this to add curls that are much larger. The Misikko website offers a number of styling tools and hair care supplies including the CHI Turbo and the ever so famous Moroccan Oil! HANAair also released a new professional hair dryer, The Premiere Hair Dryer!
The all new Hana Titanium 1.5" Flat Iron is Hana's first step into the titanium world. With the world's smoothest surface plates, the Hana titanium flat iron has proven to provide up to 80% faster straightening. With a PTFC core heater, the Hana Titanium will not only heat up in as fast as 6 seconds but the Titanium plates will be able to retain this heat better than any other! Beat the humidity and beat those frizzy curls! You don't deserve second best and neither does your hair!
AVAILABILITY:  Misikko.com
PRICE: $239.99 USD

SALE PRICE: $174.99 USD

FEATURES:
□ Heats up to 140-450° F
 Titanium iron with tourmaline
□ 100% ceramic heaters
□ 8 foot swivel cord
□ Includes travel pouch, heat proof silicone mat, and tin case

PROS:
□ Heats up quickly
□ Doesn't pull or tug on hair
□ Different heat settings for different hair types
□ Fast and easy to use
□ Comfortable to hold
□ Smooth edges work great for adding curls
□ Hair felt silky
□ Hair looked shinier and less damaged at the ends
□ Hair doesn't "sizzle" or "smoke" as much as other flat irons

CONS:
□ Takes more than one pass to straighten sometimes
□ Can sometimes take a bit longer for really thick or long hair
□ No automatic shut off (none that I'm aware of)
□ Pricey

before / after
My hair is naturally wavy and coarse but sometimes it could turn frizzy.

before / after
I tested this flat iron on my mom. Her hair is medium length but more thicker and coarser than my hair.

FINAL THOUGHTS:
□ I've been using this flat iron religiously since I've gotten it. I think it works great and I don't feel like it damages my hair nearly as much as other flat irons I've used. I noticed right off the bat how very little my hair "sizzles" and "smokes" when I use this flat iron. I am so used to seeing steam come out of my hair from flat ironing that I thought it was unusual not see that much come out of it.

□ However, being that my hair is so long, I think flat irons that are 2 inches, at the least, work better for me. I did notice it took a bit longer to straighten my hair since the flat iron had less surface area than a larger flat iron which is what I generally work with.

□ This is the first flat iron I've ever had that straightens damp hair without turning frizzy. I was in a rush one day and I had to flat iron 80-85% dry hair and doing so worked like a charm! In one pass my hair was dry, in another pass it was straight!

□ The flat iron plates are extremely smooth and my hair passes through effortlessly. It's a bit too smooth for curling but perfect for straightening! But I'm not complaining! I'm still trying to practice doing curls with this flat iron. :)

□ I checked around the website to see if it had an automatic shut off which I come to find that it doesn't. I'm guilty for forgetting to turn off my flat irons and hair curlers so it's important for me to know my flat iron will shut off in case I forget!

□ The price can be a drawback but I do have to say that compared to others that I've tried (and I've tried about 7 or 8 flat irons in my life), this is the only one that feels less damaging on my hair but still offered the same results as other flat irons.


DISCLAIMER: In no way is this blog accepting any form of payment for products received by companies. The products reviewed on this blog are based on the opinions and experiences of the author. The products in this review were provided by the company.

Wednesday, August 24, 2011

Picture Tutorial: DIY Feather Extensions


Before anyone makes a comment about it, I want to first mention that these feather extensions are not made of real feathers. They are synthetic faux feather extensions made to look like real feathers. :)

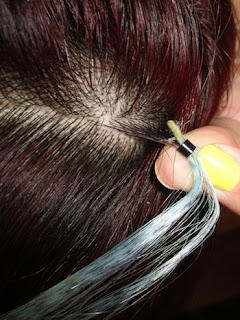
Feather extensions are pretty trendy this season. I'm not sure how everyone else feels about them but I personally think it looks cute if it's not overdone. Getting feather extensions, or any extensions I presume, can get pretty expensive if you get it done professionally. And since I'm more budget friendly when it comes to doing pretty much everything, I thought it would be fun to try DIY feather extensions myself. Applying the feather extensions was pretty easy. I practiced a little bit without the hair extensions which helped me a lot when I actually applied the extensions. I did it in one try!

You can purchase everything in this tutorial at bornprettystore.com (not including the pliers I used). They provide different color hair extensions to choose from. The colors range from pink, red, blue, green, etc. But since I already have red hair I wasn't sure how well the feather extensions would stand out so I picked a color closes to what I wanted, which was white, and got the sky blue color instead.

Note: This is just a tutorial on how to apply feather extensions. If you don't like it please keep your comments to yourself. :)

What You Will Need:
 Hair extension pulling needle (link)
 Micro beads (link)
 Pliers
 Extensions (link)

STEP 1: Open the latch door on your pulling needle

STEP 2: Insert the hair extension micro bead

STEP 3: Pick out a few strands of hair using the hook of the pulling needle and close the latch door.
STEP 4: Slide the micro bead upwards and pull the needle downwards to pull your hair through the bead.

STEP 5: Bring the micro bead close to your roots.
STEP 6: Insert your feather extension through the hole.

STEP 7: Take your pliers and clamp the micro bead till it is secure.
Make sure the micro bead is squeezed tightly to ensure it won't fall off.

FINISHED!


Feather extensions can last you a good while (a few weeks to a few months) if you take care of them properly. They can withstand being washed but just be careful not to tug on them. I have not yet tried straightening or curling the extensions. I've heard a number of people say that you can but many others have said that you can't apply heat to them and I don't want to take the risk of ruining them so I choose to leave it how it is. Anyway, I hope you all find this tutorial helpful if you decide to do feather extensions on yourself or for others. :)

Have any of you tried feather extensions?
How do you like them?


DISCLAIMER: In no way is this blog accepting any form of payment for products received by companies. The products reviewed on this blog are based on the opinions and experiences of the author. The products in this review were provided by the company.

Tuesday, August 2, 2011

DIY: No Heat Beachy Waves

When I was a teenager I was obsessed with my flat iron. It became such an essential part of my everyday routine that the only hairstyle I would ever rock was straight hair! And back then, the straighter the better! I still rely on my my flat iron most of the time but these days I learned to embrace the natural waves, curls, and kinks in my hair. My hair isn't naturally curly but it is wavy, coarse, and sometimes poofy. I try not to straighten my hair too much and I hardly ever blow dry my hair, but I know that if I don't do anything to my natural hair it will look untamed and really messy.

Every once in a while I like to add twist braids to both sides of my 85% dry hair after I wash it. If you don't know what a twist braid is, it's basically grabbing two strands of hair and you're literally just twisting them together. It's so easy! If you don't know how to do a "French" twist braid, you can just divide your hair into sections and twist them and you'll get the same results. The great thing about it being so easy to do is the outcome of really pretty loose waves, or what I like to call, beachy waves.

I leave them in overnight and the results truly speak for themselves. I love it because it looks like I actually put in the extra effort to get my hair to look this way AND I didn't cause any damage by applying any heat to it. So it's a win win situation if you ask me. :)

Tips to achieve this hairstyle:
1. Twist the braids really tight because they'll come loose. As long as you start off with tight twists, you'll be fine.
2. Make sure your hair is damp, the waves will hold up better.
3. Once you let your hair down apply a light mist of flexible hairspray to keep the waves lasting all day.
4. Remember the small, tighter, and thinner the twists, the more curly your hair will be. It all depends on your personal preference.


Tuesday, May 17, 2011

Herro.


I dyed my hair today! I'm going back to red. It's a work in progress right now since I previously dyed my hair black and then dark brown. So it's a little hard to get back to how it was last summer since my dark hair is being so stubborn. But it's gonna take another session or two to get it the way I want it. My hair is being weird right now. Since I settle for at-home hair dye my roots are extremely red while the rest of my hair is dark red. So it looks weird if you stare hard at it. But I'm determined to even it out and get it hot and ready for Summer! Yay!

Wednesday, March 16, 2011

EOTD: Smokey Eye With A Hint Of Purple + Braided Headband

Here's a very subtle smokey eye with a touch of purple that I did the other day. I haven't been doing too much with my looks lately so this is pretty much the most I've been doing. I hope you guys aren't missing my looks too much because this is the most I've done in a while. Even less on most days! I've also been having pretty bad eyebrow days as well. Yeah, I do have my bad eyebrow days and I've been having them on a regular basis. So that's one reason why I've been feeling so unmotivated to do more looks. Anyway, just thought I would squeeze this look in for you all. Hope you enjoy it!


EYES:
UDPP as a primer
MAC Bare Study paint pot applied as a second base
MAC Brule eyeshadow applied to the eyelids and as a highlight
MAC Nylon eyeshadow applied on top of Brule
MAC Romp eyeshadow applied to the crease
MAC Carbon eyeshadow to darken the crease
MAC Cork eyeshadow to soften the outer edge
Maybelline Gel Liner on upper lash line
UDPP eyeliner in Zero applied to waterline
Glamour Doll Eyes eyeshadow in Tattoo applied to lower lash line
False eyelashes from Born Pretty Store


A few days ago I also wanted to try something new to my hair  because I was bored with it. So I decided to copy this YouTube video tutorial of this braided headband hairstyle that I thought was cute. I still haven't mastered how to fix my hair this way because it was a little bit uncomfortable and I didn't pin them very tightly to my head so they felt loose. But I thought I would share with you guys anyway! You ladies should try it!


Thursday, June 24, 2010

My Hair Is Red!

Taken indoors. I have yet to see how it looks out in sunlight!

main components:
 1) Developer helps oxidize and open your hair shaft to help the color stick permanently.
I chose number 30 for extra lift.

2) L'Oreal Excellence HiColor HiLights in Red.
Two boxes is required for my hair length and thickness.

You will also need:
3) Gloves
4) Plastic bottle applicator or a plastic bowl
5) Tint brush

I mixed about 1.5 oz of developer per box of hair dye. I started from the bottom portion of my hair, working my way up, doing the top of my head last. I left the dye on for about 30 minutes which is probably more than enough.

This is my first time dying it red and actually having it come out red! I attempted this before but I had forgotten that I previously dyed my hair black which obviously wasn't going to absorb any of the red hair dye. So when I dyed it, it came out really dark red and then faded to brown. Since my hair turned brown I thought it was a good time for me to dye it red again and this time it was a success!

Sunday, May 2, 2010

Product Review: BrushLab Thermal Round Hair Brush


They need to change the name of this brush to The Ultimate Sex Hair Brush!!!

I kid you not! After I used this hair brush, I could not stop running my fingers through my hair and have it flow down my face like, well... sex hair! I don't mean to sound all raunchy or anything. But it's the truth! And the truth is, I love this brush!

Personally, I am not one who uses a hair dryer on a regular basis. I hardly ever do! Matter of fact, I can't remember the last time I ever pulled out my hair dryer. I always air dry my hair after i shower and after that, I flat iron. I'm guilty of using a flat iron too many times on my hair which is probably why it's so damaged at the ends. I just can't help it! It's a fast and easy way to have tamed hair, which is why I do it too often.

AVAILABLE AT: Brushlove.com
PRICE: $18.98 USD
BARREL SIZE: 3"
VALUE FOR PRICE: 3/5
EASE OF USE: 4/5
PACKAGING: 4/5
MEETS EXPECTATIONS: 4/5
OVERALL USE: 4/5


PROS:
It adds volume to your hair 
It gives your layers more dimension
The barrel is made of thermal ceramic that heats up! This helps distribute heat to prevent over drying & damage.
Versatile brush. You can straighten, curl, or add volume to your hair.
Your hair looks healthier rather than stick straight hair that a flat iron would typically do to your hair.
Your hair won't feel weighed down
Comfort grip handle
100% natural premium cut boar bristles

CONS:
If you're not used to using a brush like this, it might take longer to style. It's definitely something to get used to.
Using it against a hair dryer seems like it causes more damage (I don't know how, it just seems like it)


OVERALL:
My overall experience with this brush made me think different about using round, boar bristle brushes. I remember as a little girl I used to play with my mom's rounds brushes (because I wanted to be like her) and I would always get it tangled in my hair and it would get stuck! I was basically afraid to use this because I had a lot of bad experiences using them. But after my entire life (literally), I finally gave this another whirl. And since the good definitely outweighs the bad, you can say that this will definitely not be the last time I use this technique over a flat iron.

I thought this particular size was perfect for my long hair. I didn't have much trouble running this through my hair since it actually made my hair smoother and less tangled. Except for when my hair was still extremely wet but I guess that's a given.

The comfort grip handle made it very comfortable for my hands. You're basically holding on tightly to this brush since you're somewhat pulling on your hair so the comfort is a definite plus.

HOW I STYLED MY HAIR:
With this brush you can either straighten, curl, or add volume to your hair. I was definitely going for volume. What I did first was I took pieces of my hair on top and I put it under the hair brush so that it's flared outwards. And then I straightened underneath it slowly with the concentrator attachment and rolling the brush outwards, pulling it down my hair at the same time. When I got to the very ends of my hair, I concentrated more heat so that it was sure to flare out at the bottom (as you can see in the pictures). Then I took hair from the crown of my head and I put it over the hair brush and I concentrated the hair dryer on top so that it added more volume to the crown.

I'm sure you are all familiar with how my hair looks on a regular basis when I do makeup looks, you can definitely tell that my hair is usually straight, unstyled, and flat! But the after pictures of using my hair dryer and the thermal round hair brush made my hair look in such a way that I can't recall the last time it ever looked bouncy and voluminous. I styled my hair the night before and when I woke up the next morning, my hair was still bouncy and voluminous! I love what it did to my hair.


WOULD I RECOMMEND THIS PRODUCT?
Yes
WOULD I PURCHASE AGAIN? I would definitely purchase other brushes from their website!


DISCLAIMER: In no way is this blog accepting any form of payment for products received by companies. The products reviewed on this blog are based on the opinions and experiences of the author. The products in this review were provided by the company.

Sunday, April 25, 2010

HANA Professional Flat Iron Review

I've been lemming this Pink Edition Hana Professional Flat Iron ever since I've seen it being reviewed on a lot of other beauty blogging sites. At the time, I was also looking for 1 inch flat iron so I can do curls with them. I usually straighten my hair with a 1 1/2 inch flat iron so it's way too big to do curls.


I was finally chosen as a giveaway winner so big thanks to Tammy for hosting this giveaway for Misikko for providing this flat iron for me.

Includes: Travel Pouch, Heat Proof Silicone Mat, Shine Shield Styling Therapy & Tin Case


AVAILABLE AT: Misikko.com
PRICE: $109 (currently on sale for $73.99)
VALUE FOR PRICE: 4/5
EASE OF USE: 4/5
PACKAGING: 5/5
MEETS EXPECTATIONS: 4/5
OVERALL USE: 4/5

PROS:
heats quickly at a high of 450 degrees
made of ceramic plates that won't damage your hair
floating plates allow less tension on your hair
easy to see the numbers on the dial (most numbers on flat irons are too small)
thick swivel cord
glides smoothly and does not tug on hair
red LED light blinks when the flat iron is ready
tourmaline embedded plates which gives your hair shine
gives nice curls


CONS:
takes time to straighten long/thick hair
no auto shut off

OVERALL:
I'm really loving this flat iron. I also love the fact that it comes with a heat proof silicone mat which allows me to set my flat iron down freely without burning anything. And I've had really bad experiences with other flat irons burning the paint on my vanity! For a one a inch flat iron it actually straightens my hair just as well as a 1 1/2 inch flat iron would and that's what I usually use for flat ironing my hair. I also love using this for curling my hair. Unfortunately I don't have any picture of my hair curled using this product.

My hair looks so much shinier in the after picture!
This is with no Shield Shine treatment. I love how the tourmaline gives my hair shine.


DISCLAIMER: In no way is this blog accepting any form of payment for products received by companies. The products reviewed on this blog are based on the opinions and experiences of the author. The products in this review were provided by the company.


Monday, December 15, 2008

Update, Hauls, New Hair Color?

Hello all! I just wanted to do a quick update for everyone. This week is finals week so I have to cram in a lot of homework that's due and I gotta study. I just got done with my Geo final and I'm pretty sure I'm passing the class with a "B" since I calculated all of my scores. I have 3 more finals to go.

Anyway, I also just want to add that I will be doing more make-up tutorials. Even though it takes so much work to do, I actually enjoy doing it. Sometimes I wish I got paid to do these things. LOL. Just kidding. So I do read everyones comments and I check my e-mail like 100x every hour. I've gotten everyones requests and I promise to do them. I need to start writing them down or else I'll lose track. hehe.

But anyway, I dyed my hair yesterday. I'm not sure I like it so much. The blonde turned out to be more orange and I wanted it to be more platinum blonde. But I do think the flash in my camera makes it seem that way. I might dye it purple but I'd have to wait til after Christmas or my mom would go crazy. I'll take any sort of constructive criticism from you ladies. So love it or hate it, just let me know! I won't be publishing hater comments so you can be as mean as you want. LOL. Just kidding.


I went to Mitsuwa on Sunday. Didn't buy much. I tried out the egg peel mask and I love it! It makes my skin feel so smooth. I'll be doing a review on it soon. [:
I bought this Tweezerman Ilashcomb at Sally's for about $7. This stuff is amazing and I love how small it is. I was watching Christiana do her mascara accessories video and I was so tempted to get one of those eyelash combs that she has. I didn't wanna buy one online but when I went to Sally's I saw one so I had to get it!