Connect

Showing posts with label LOOKS: Copper/Bronze. Show all posts

Monday, January 16, 2012

FOTD: Shimmering Suede Tutorial

I wanted to use one of my favorite MAC pigments and that's Blue Brown pigment. I was really hoping for the blue to show through, but because I added a bronze base it completely took that out. It's okay though because I'm really loving the warm red tones of the brown in this pigment. I think if the blue showed up, I would have loved this look a lot more. Anyway, I'm also wearing G&G circle lenses which I'll be reviewing soon along with other lenses. :)

MAC Blue Brown Pigment Swatch
Flash / No flash
Applied dry and wet


EYES:
□ Urban Decay Primer Potion
□ Maybelline Color Tattoo 24hr Eyeshadow in Bad to the Bronze (all over the lid)
□ MAC Blue Brown pigment (all over the lid & middle lower lash line)
□ MAC Coppering eyeshadow (above the crease)
□ Urban Decay Creep eyeshadow (outer corner & lower lash line)
□ Wet N Wild Vanity Palette - highlight color (brow bone highlight)
□ Urban Decay Sin eyeshadow (inner corner & inner lower lash line)
□ Milani Liquif'Eye Metallic Eyeliner in Black (lower waterline)
□ Covergirl Lashblast Mascara
□ Lashes from Kiwiberry style #11

BROWS:
□ NYC Browser Brow Kit
□ MAC Carbon eyeshadow

CHEEKS:
□ Elf Contouring Blush & Bronzing Powder

LIPS:
□ Maybelline Color Sensational Lipstick in Totally Toffee
□ Wet N Wild Glassy Gloss Lip Gel in This Too Shall Glass

Saturday, December 24, 2011

Golden Bronze Naked Palette Look

First off, Merry Christmas Eve! :D I'm LOVING my Urban Decay Naked Palette but I find it so difficult to photograph. Does anyone else have this problem? Usually I have this problem with frosty/shimmery eyeshadows and since majority of these shadows have a frost finish, it was hard to capture the the look of it. I'm going to play around with it more and hopefully I could get better pictures next time :)


EYES:
□ Urban Decay Primer Potion
□ MAC Painterly Paint Pot
□ Buck eyeshadow (crease)
□ Half Baked eyeshadow (inner third & inner lower lash line)
□ Smog eyeshadow (middle lid)
□ Hustle eyeshadow (outer third & outer lower lash line)
□ Creep eyeshadow (outer corner)
□ Naked eyeshadow (brow bone)
□ MAC Blacktrack Fluidline (upper lash line)
□ Urban Decay 24/7 eyeliner pencil in Perversion (lower waterline)
□ Covergirl Lashblast mascara
□ Model 21 Lashes #12

BROWS:
□ NYC Brow Pencil in Taupe
□ NYC Browser Brow Kit

CHEEKS:
□ NARS Laguna Bronzer
□ Milani Luminoso Blush
□ MAC Redhead MSF

LIPS:
□ Revlon Nude Attitude lipstick
□ NYX Cafe Latte lipgloss

Monday, November 7, 2011

Sultry Golden Bronze and Gunmetal Eye Makeup

Here's a smokey eye using some limited edition/discontinued pigments that I've had for a while now. Don't be discouraged because all of these colors can be easily substituted. All you need to achieve this look is a gold, bronze, and any dark gray or black eyeshadow will do.

For the first time in almost all my looks, this one was difficult to capture in a full face shot. For once this look actually looked better up close than far away. Also, the lashes were really stubborn. I paired 2 different lashes on top of each other and it was just really thick and heavy to work with even though I love how full and fluttery they look. So please don't mind the uber wonky looking lashes. I promise, it looked better in person! Nonetheless, enjoy! :)


EYES:
□ Senna Cosmetics Totally Transforming Eyeshadow Primer
□ MAC Bare Study Paint Pot
□ MAC Gold Mode Pigment (inner corner & inner lower lash line)
□ MAC Gold Stroke Pigment (middle lid & middle lower lash line)
□ MAC Pandemonium eyeshadow (outer corner, crease & outer lower lash line)
□ Inglot #352 Matte (brow bone)
□ Inglot #360 Matte (transition color)
□ Wet N Wild Color Icon eyeliner in black black (lower waterline)
□ Covergirl Lashblast Mascara
□ Combination of 2 pairs of lashes (unknown)

BROWS:
□ NYC Brow Pencil in Taupe
□ NYC Browser Brow Kit

CHEEKS:
□ NARS Laguna Bronzer
□ MAC Ambering Rose Blush

LIPS:
□ NYX Marrakesh Pink Round Lipstick
□ Wet N Wild This Too Shall Gloss Glassy Gloss

Saturday, October 22, 2011

Achieve the Look: Peachy Golden Brown EOTD

I just got home from a night out and I'm really tired but I thought I would push this out of the way before I go to sleep. This is my eye makeup I wore tonight. I wanted something subtle but I didn't want to go with basic browns and neutrals. I didn't feel like putting any effort into a smokey eye either so I decided to go with some golds and browns with a pop of shimmery coral in the inner third. My camera has a hard time picking up shimmers and light colors so it looks really washed out! I had to play with the contrast a little bit when I was cropping the pictures.

Since I was in a rush to do this look I didn't have time to take any full face shots. But in case anyone is wondering, I paired it with Elf Pink Kiss gloss with NARS Laguna bronzer and MAC Blonde MSF on the cheeks. I'll put down the list of eyeshadows some time tomorrow because right now I don't have them memorized. I'm just so ready for bed! Have a great weekend everyone! :)


Achieve the look:

Thursday, August 18, 2011

Look Using NEO Glamour Green Contact Lenses

These lenses I received are courtesy of EyeCandyLens.com. I was browsing through their website and was so overwhelmed with the number of lenses they have. I couldn't decide what I wanted. I knew I wanted regular lenses as opposed to "circle lenses" because I find more discomfort in lenses that are larger in diameter. I don't wear contact lenses that often but I do like to wear them for doing makeup looks and taking pictures. 

I'm especially pleased with this pair that I received. It looks really natural and it's a fun way for me to change up my look. 
If you're looking for lenses that make your eye's iris appear larger, you won't find it in this pair. They're comfortable but much like most lenses, they do make my eyes feel dry quickly. I don't think it's the lenses fault, but my eyes. Overall I really like this pair of lenses even though I'm not the type to wear them all the time. At first I didn't think they would make my eyes stand out too much because it didn't look like much in the packaging but they look really great especially for those with brown eyes. :)

Use code "TINAMARIE" for a free surprise gift with your purchase

Product Description
→ Brand: NEO
→ Origin: South Korea
→ Water content: 42%
→ Diameter: 14.2 mm
→ Base Curve: 8.6
→ Power: plano
→ Duration: 1 year disposable
→ Price: $29.40


Items Used:
MAC Saddle eyeshadow
MAC Antiqued eyeshadow
MAC Nylon eyeshadow
MAC Smolder eye kohl
MAC Most Popular lipstick (LE)
MAC Rougette lipstick (LE)
NARS Orgasm blush
MAC Gingerly blush

DISCLAIMER: In no way is this blog accepting any form of payment for products received by companies. The products reviewed on this blog are based on the opinions and experiences of the author. The products in this review were provided by the company.

Wednesday, August 11, 2010

LOOK: Sultry Golden + Lash Royalty - Review, Photos and Swatches

I was kind enough to receive lashes from Lash Royalty and you guys know how crazed I am over lashes! I was inspired by the name Lash Royalty because when I think of Royalty I think of high status, major blingage, the one who wears the crown, etc. I also wanted to use my Sugarpill Goldilux loose eyeshadow so I decided to put two amazing products together into one look. I hope you like it! Products used and review on these lashes at the end. :)


EYES:
UDPP as a base
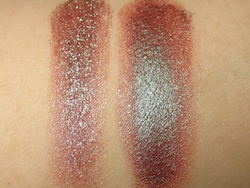
Sugarpill loose eyeshadow in Goldilux applied to inner 3/4 of the lid
MAC Romp eyeshadow applied above crease
MAC Carbon eyeshadow applied to outer 1/4 of the lid
MAC Nylon eyeshadow applied to inner corners
MAC Shroom eyeshadow applied as a highlight
MAC Eye Kohl in Smolder smudged on lower and upper lash line
Lash Royalty lashes in Miss Cherie

CHEEKS:
MAC Ambering Rose

LIPS:
MAC 4N Lipstick


Lash Royalty

I received these lashes from LashRoyalty.com and I love them! I love everything from its packaging to the lashes. These lashes are very comparable to your top of the line lashes because they are made with such great quality. The look and feel of them couldn't be any more comfortable on my eyes.

One drawback about these lashes is the variety of lashes are that are available. But then again, all the lashes are very different in their own way that there has to be one design out there for everyone! Another drawback would have to be the price. At $15 a pair, I could probably stock up on 4 pairs of lashes from a different brand. But keep in mind the quality of these lashes! The lashes aren't at all flimsy, and the band isn't too thick where it feels stiff and uncomfortable.

If you see the look I did above, you can see that I'm not wearing any obvious eyeliner on my upper lash line because I wanted to show you guys how close I was able to get to my real lash line with these lashes. While some lashes feel heavy on my eyes, these felt very light like I wasn't wearing any!


I believe these are bottom lashes.


DISCLAIMER: In no way is this blog accepting any form of payment for products received by companies. The products reviewed on this blog are based on the opinions and experiences of the author. The products in this review were provided by the company.