Connect

Showing posts with label LOOKS: Gray. Show all posts

Monday, April 15, 2013

MAC Archie's Girls Caramel Sundae Palette Tutorial

Here's a look using Archie's Girls Caramel Sundae Palette. I have to admit these eyeshadows were a bit difficult to work with especially when using them all together. I think these colors would look gorgeous if I were to pair them with other colors that compliment them instead of using them all in one look. The look didn't come out the way I expected it to but I thought it came out nice either way. It's a soft smokey eye that's very subtle and very wearable for all skin tones and eye colors. Hope you like it! :)


Wednesday, April 10, 2013

Gold Glitter Smokey Eyes for Prom

Hello and long time no post! It's been about 2 weeks since I did my last tutorial and I knew I had to make a comeback soon. I've been stressing out over some personal things going on in my life and doing tutorials is honestly my best escape. I thought I would start a prom series on YouTube and on my blog since prom season is coming up. This look I did is so easy to do and it took very little effort. I thought I would make the look simple and easy to follow for those who will be doing their own makeup for prom. And by simple I mean not complicated, not necessarily natural looking. Anyway, I hope you all enjoy it. As always thanks for watching and visiting my blog. Take care! xoxo


EYES:
Lorac eye primer
Maybelline Color Tattoo Tough as Taupe
Inglot #337 Matte (Soft Brown)
Inglot #457 DS (Lid color)
Lorac Espresso (Outer corner)
Inglot #08 AMC Shine (inner corner highlight)
Inglot #351 Matte (Brow bone highlight)
Urban Decay 24/7 Eye Pencil in Perversion
Maybelline The Rocket Mascara
#47 Lashes (Dupe of Red Cherry #47)

CHEEKS:
Hoola Benefit Bronzer
MAC Coppertone Blush

FACE:
Covergirl 3 in 1 Foundation (Nude Beige)
MUFE Full Cover Concealer
Ben Nye Banana Powder
MAC MSF Natural (Medium Plus)

LIPS:
NYX Circe Round Lipstick
MAC Summer Sweetheart lipglass (LE)

Thursday, January 19, 2012

Urban Decay Naked 2 Palette Look - Tutorial

Here's my first look using my Urban Decay Naked 2 Palette. I still have to do a tutorial using the first Naked Palette so that will be coming up shortly. :) Hope you all like this look. Thanks for reading! I'm also wearing gray contacts that I'll be reviewing so stay tuned for that!


EYES:
□ MAC Painterly Paint Pot
□ Tease eyeshadow (crease & transition color)
□ Verve eyeshadow (inner half of eyelid & inner lower lash line)
□ Pistol eyeshadow (outer half of eyelid & outer lower lash line)
□ Blackout eyeshadow (outer corner & outer lower lash line)
□ Foxy eyeshadow (brow bone highlight)
□ Elf Cream Eyeliner in Black (upper lash line)
□ MAC Smolder Eye Kohl (lower waterline)
□ Covergirl Lashblast Mascara
□ False eyelashes from KIWIBERRY style #2

BROWS:
□ NYC Browser Brow Kit
□ MAC Carbon eyeshadow
□ NYX Concealer in a Jar (shade beige)

CHEEKS:
□ Elf Contouring Blush & Bronzer Powder
□ Wet N Wild Blush in Heather Silk

LIPS:
□ Wet N Wild Mega Last Lip Color in Just Peachy
□ MAC Of Corset lipglass

Wednesday, January 18, 2012

FOTD: Phloof! and Sketch

I was going to film a tutorial for this look but I was pressed for time. I watched a Youtube video the other day and this girl had mentioned how much she loved MAC Sketch eyeshadow especially as a crease color and I realized I haven't touched Sketch in so long. So I decided to remove all the dust it collected just sitting in my makeup drawer and put some use to it. Another eyeshadow I haven't used in so long is MAC Phloof!. Considering it's one of my favorite highlight colors and "inner eye corner" color, I don't use it very much because I'm close to hitting pan even though I know it's a permanent shade. Anyway, hope you all like this look. Thanks for looking. :)


EYES:
□ Urban Decay Primer Potion
□ MAC Painterly Paint Pot
□ Maybelline Color Tattoo 24hr Eyeshadow in Too Cool (eyelid)
□ MAC Phloof! eyeshadow (eyelid & inner lower lash line)
□ Wet N Wild Greed Palette - Peach (crease & transition color)
□ MAC Sketch eyeshadow (crease & outer lower lash line)
□ Wet N Wild Greed Palette - Matte black (outer crease & outer lower lash line)
□ Wet N Wild Greed Palette - highlight color (brow bone highlight)
□ Wet N Wild Creme Liner (upper lash line)
□ Milani Liquif'Eye Metallic Eyeliner (lower waterline)
□ Covergirl Lashblast Mascara
□ False eyelashes from Kiwiberry style #2

BROWS:
□ NYC Browser Brow Kit
□ NYX Concealer in a jar (shade beige)

CHEEKS:
□ Elf Contouring Blush & Bronzer Powder
□ Milani Blush in Dolce Pink

LIPS:
□ Rimmel Lasting Finish Intense Wear Lipstick in Pink Blush
□ Avon Glazewear Lip Gloss in Dazzling Diamond

Saturday, January 7, 2012

Royal Blue Eyeliner Look

Here's the look I wore when my boyfriend and I went out to celebrate our 4 year anniversary. This look was inspired by a girl named Kristina Monique. I love her name by the way ;) I fell in love with her makeup when she was featured in Pursebuzz's videos. I automatically had to recreate it and I knew I had the most perfect blue eyeliner to go with it. It's a shame that MAC came out with such an amazing product and discontinued it. Had I known they were going to do that I probably would've purchased another jar of Royal Wink Fluidline... or maybe 10 :P But that's okay because I know there's a dupe for it somewhere out there and I believe there is one by Sephora called Fancy Blue. It looks just about right or damn near close to it! I'm probably going to purchase the Sephora liner and keep my Royal Wink Fluidline some place safe because I don't know what I would do without it!
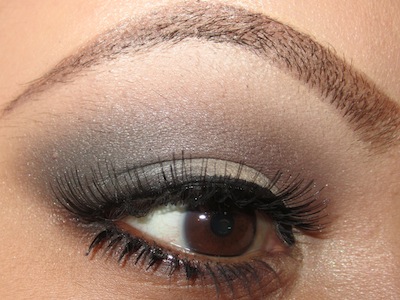


EYES:
□ Urban Decay Primer Potion
□ MAC Painterly Paint Pot
□ MAC Cork eyeshadow (crease & transition color)
□ Inglot #434 Pearl eyeshadow (crease)
□ MAC Carbon eyeshadow (outer corner)
□ Inglot #390 Matte eyeshadow (lid color)
□ MAC Blanc Type eyeshadow (brow bone highlight)
□ Inglot #498 DS eyeshadow (lower lash line)
□ MAC Royal Wink Fluidline (Sephora Fancy Blue Eyeliner can be substituted)
□ Wet N Wild Creme Liner (upper lash line)
□ MAC Smolder Eye Kohl (lower waterline)
□ Covergirl Lashblast Mascara
□ Bornprettystore lashes #113

BROWS:
□ NYC Brow Pencil in Taupe
□ NYC Browser Brow Kit
□ MAC Carbon eyeshadow
□ NYX Concealer in a Jar (shade beige)

CHEEKS:
□ Temptu Air pod Blush in Tempting Coral
□ NYX Mauve Blush

LIPS:
□ Maybelline Sensational Lipcolor in Totally Toffee
□ MAC Oh Baby lipglass

Tuesday, December 27, 2011

Everyday Smokey Eyes with Urban Decay Naked Palette

The end of this year is fast approaching and I know I said I'll be doing some looks for NYE but I had to get some looks I did using my Naked Palette out of the way first! I've been turning to this palette for those days where I'm unsure of what to do for my eye makeup. I have another look using this palette that I'm waiting to post but I think I'll do that after I get at least one NYE makeup look out of the way. I'm not sure how many NYE looks I'll be doing but I'll try to get at least 2! For now, enjoy this simple smokey look that's appropriate for everyday. All the eyeshadows listed are from the Naked Palette.


EYES:
□ Urban Decay Primer Potion
□ MAC Painterly Paint Pot
□ Buck eyeshadow (crease & transition color)
□ Virgin eyeshadow (brow bone highlight)
□ Sin eyeshadow (inner half of eyelid & inner lower lash line)
□ Sidecar eyeshadow (outer half of eyelid)
□ Hustle eyeshadow (outer crease & outer lower lash line)
□ Creep eyeshadow (outer corner & crease)
□ Maybelline Eye Studio Lasting Drama Gel Liner (upper lash line)
□ Milani Liquif'Eye Metallic Eyeliner in Black (lower waterline)
□ Covergirl Lashblast Mascara
□ Model 21 Lashes #19

BROWS:
□ NYC Brow Pencil in Taupe
□ NYC Browser Brow Kit
□ NYX Concealer in a Jar (shade beige)

CHEEKS:
□ NARS Laguna Bronzer
□ Milani Luminoso Blush

LIPS:
□ Revlon Nude Attitude Lipstick
□ NYX Cafe Latte Round Lipgloss

Monday, November 7, 2011

Sultry Golden Bronze and Gunmetal Eye Makeup

Here's a smokey eye using some limited edition/discontinued pigments that I've had for a while now. Don't be discouraged because all of these colors can be easily substituted. All you need to achieve this look is a gold, bronze, and any dark gray or black eyeshadow will do.

For the first time in almost all my looks, this one was difficult to capture in a full face shot. For once this look actually looked better up close than far away. Also, the lashes were really stubborn. I paired 2 different lashes on top of each other and it was just really thick and heavy to work with even though I love how full and fluttery they look. So please don't mind the uber wonky looking lashes. I promise, it looked better in person! Nonetheless, enjoy! :)


EYES:
□ Senna Cosmetics Totally Transforming Eyeshadow Primer
□ MAC Bare Study Paint Pot
□ MAC Gold Mode Pigment (inner corner & inner lower lash line)
□ MAC Gold Stroke Pigment (middle lid & middle lower lash line)
□ MAC Pandemonium eyeshadow (outer corner, crease & outer lower lash line)
□ Inglot #352 Matte (brow bone)
□ Inglot #360 Matte (transition color)
□ Wet N Wild Color Icon eyeliner in black black (lower waterline)
□ Covergirl Lashblast Mascara
□ Combination of 2 pairs of lashes (unknown)

BROWS:
□ NYC Brow Pencil in Taupe
□ NYC Browser Brow Kit

CHEEKS:
□ NARS Laguna Bronzer
□ MAC Ambering Rose Blush

LIPS:
□ NYX Marrakesh Pink Round Lipstick
□ Wet N Wild This Too Shall Gloss Glassy Gloss

Friday, August 26, 2011

AK Brand False Eyelashes From KKCenterHk

True story: false eyelashes are my best friend! Haha :) Anyway, I'm starting to get used to the look of wearing top and bottom lashes together. I still don't pull off this look nearly enough as I'd like to but I really love the look of full lashes.

AK Brand lashes are from Taiwan and are 100% handmade. Each box comes with 5 pairs of lashes. They have a variety of both top and bottom lashes ranging in different styles. You can purchase these lashes at KkCenterHk for $12.50(USD) a box.


Style: #601

Style: #601

These lashes are very similar to other ones I've tried (but I forgot which brand they were). These lashes are wispie and very comfortable! I really love lashes that have invisible bands like this because I feel like it stays put on my eyes longer than other lashes with thicker bands. It also feels more natural because they're not heavy on the eyes. They flare out nicely wear the inner corner is shorter compared to the outer corner. To me these are more of my idea of "natural" lashes so I would definitely wear these on a regular basis. They're not too short or too long so it's just right if you're looking for something simple yet elegant.

Style: #682B (bottom lashes)

Style: #682B (bottom lashes)

These bottom lashes are short and thick and comfortable to wear. Again, I prefer lashes with invisible bands because it feels lighter and feels like you're not wearing anything. Other bottom lashes made my eyes feel stiff but these bottom lashes are definitely the most comfortable. As always, I cut the bottom lashes in half because I like the look of thicker lashes more towards the outer half but you could very much use the entire band if you wanted to. 


DISCLAIMER: In no way is this blog accepting any form of payment for products received by companies. The products reviewed on this blog are based on the opinions and experiences of the author. The products in this review were provided by the company.

Wednesday, August 10, 2011

Series 3: Wet N Wild Greed Palette Look & Tutorial

I decided to do a series of looks using each of the Wet n Wild Color Icon Eyeshadow Palettes (6 Pan). These shadows are really inexpensive and made with really great quality. Each color has amazing pigmentation with  smooth and rich, but never powdery texture. With a mixture of both matte and shimmer eyeshadows, there are endless possibilities to create different looks just by mixing and matching different colors from each palette. Within the next upcoming posts I'll be focusing on creating a look using each palette and working with some (or all) of the 6 colors. Greed is a palette that really caught my attention because I never thought of putting these types of colors together. Unfortunately I didn't have the best luck with this palette. At first sight I thought the colors were really elegant and I thought the colors would be vibrant. The colors turned out to be just okay. I had this look in my head but when I tried to recreate it, it just didn't turn out the way I had hoped. The shimmer colors were the most disappointing because they had the least pigmentation. Overall, this palette would go great for something to wear everyday. I almost didn't want to do a tutorial for it because it didn't seem "tutorial worthy" but since I promised you guys this, here it is! For anyone who has tried this palette or plans to, I hope that you have better luck with it than me. Enjoy! Note: I'll be doing a product review for the lenses I'm wearing in this look. Stay tuned!